Multichannel fluorescence & multiple classifications
Part 1: A way to approach multiplexed images with QuPath
This is the first of a two-part series looking at how QuPath can handle multiple classifications to start working more meaningfully with multiplex images.
Part #2 will look specifically at one proposed change in QuPath to help make this possible.
The previous post showed an example of a 32-bit multichannel image in QuPath. Here, we will look at how such images could be handled using QuPath, with minimal changes to the software itself.
Be warned that if you don’t like scripting you probably won’t like this… it is rather detailed, and only a first step towards a more user-friendly approach to handling multiplexed images in QuPath.
The original TIFF image used in this post is LuCa-7color_[13860,52919]_1x1component_data.tif from Perkin Elmer, part of Bio-Formats sample data available under CC-BY 4.0.
Installation instructions
This post relies on the latest Bio-Formats extension (currently v0.0.7).
You’ll also need the v0.1.3-multiplexing branch of my QuPath fork, because it incorporates some experimental changes. This blog gives an opportunity to discuss whether these changes should go directly into QuPath, or if they need more refinement.
To access QuPath from my fork, you can follow the step-by-step guide, with the following difference:
- After Step #3, make sure that the drop-down menu for Current branch in GitHub Desktop reads v0.1.3-multiplexing instead of master.
Once you build QuPath and start it up you should see the following message:

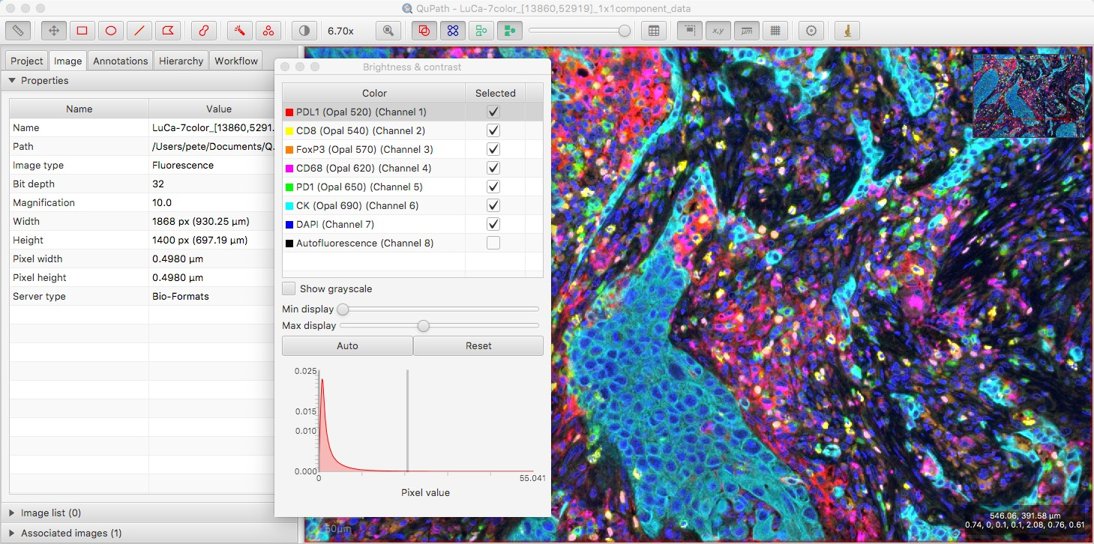
With these in place, as described last time, any channel names that are available should be visible in the Brightness/Contrast dialog.
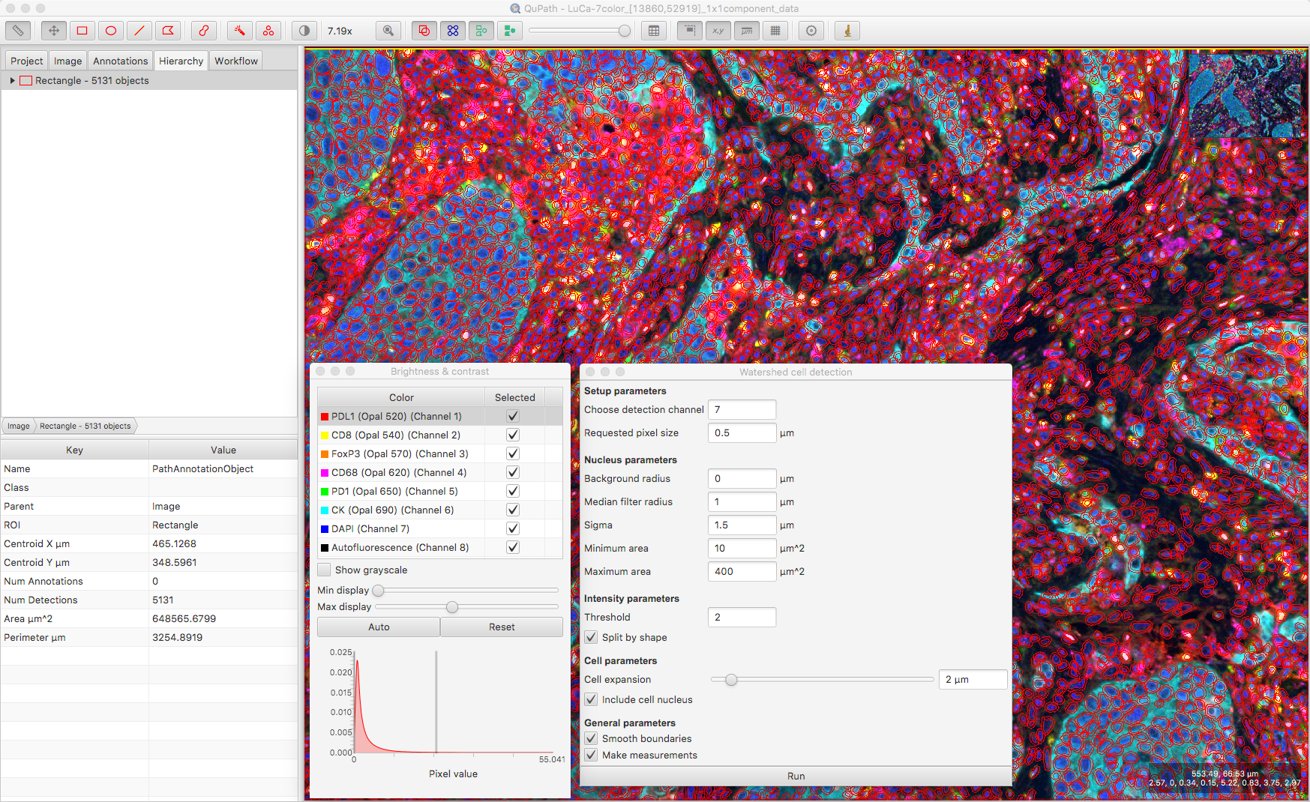
Detecting cells
QuPath’s Cell detection command can be applied to both brightfield and fluorescence images.
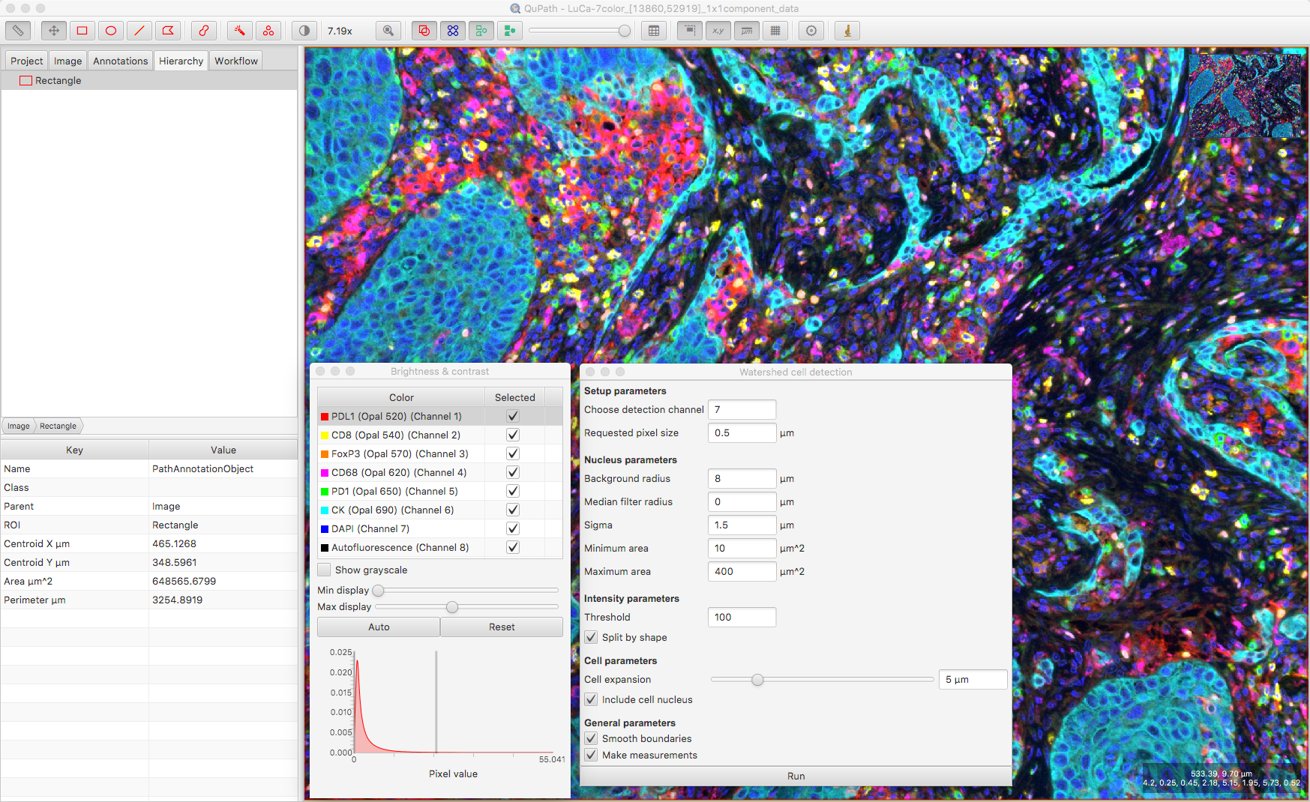
The key thing is that the Image type needs to be set first, so that the Cell detection dialog opens with the appropriate options. You can find this under the Image tab, and it may already be correct if it was set previously or automatically estimated correctly when opening the image. If not, you can double-click on it to change its value.

With the Image type set to Fluorescence, I can choose which (single) channel to use for nucleus detection. From the Brightness/Contrast I can see that DAPI is Channel 7, so I’ll use that.
After setting the channel, I click Run and… nothing is detected. This is suboptimal, but predictable.
When this happens, my suspicions always turn first to the Threshold value; in general, if this is too high then I’ll miss everything, and if it’s too low then I’ll detect far too much.
I can check roughly the intensity values in the DAPI channel inside and outside nuclei by moving my mouse over the image, and cross-referencing the pixel values displayed on the bottom right of the viewer. This gives me some idea what a suitable Threshold parameter value might be.
After that, a bit of trial and error is involved to explore the effect of changing other parameters. Here, I’ve set the Background radius to zero (i.e. don’t bother subtracting background), because it doesn’t seem necessary for this image and might do more harm than good when nuclei are densely packed together.
I’ve also increased the smoothing to reduce fragmenting individual nuclei, and decreased the cell expansion because I want to try to keep cell measurements restricted to the appropriate cells, and not steal too much from neighboring cells.
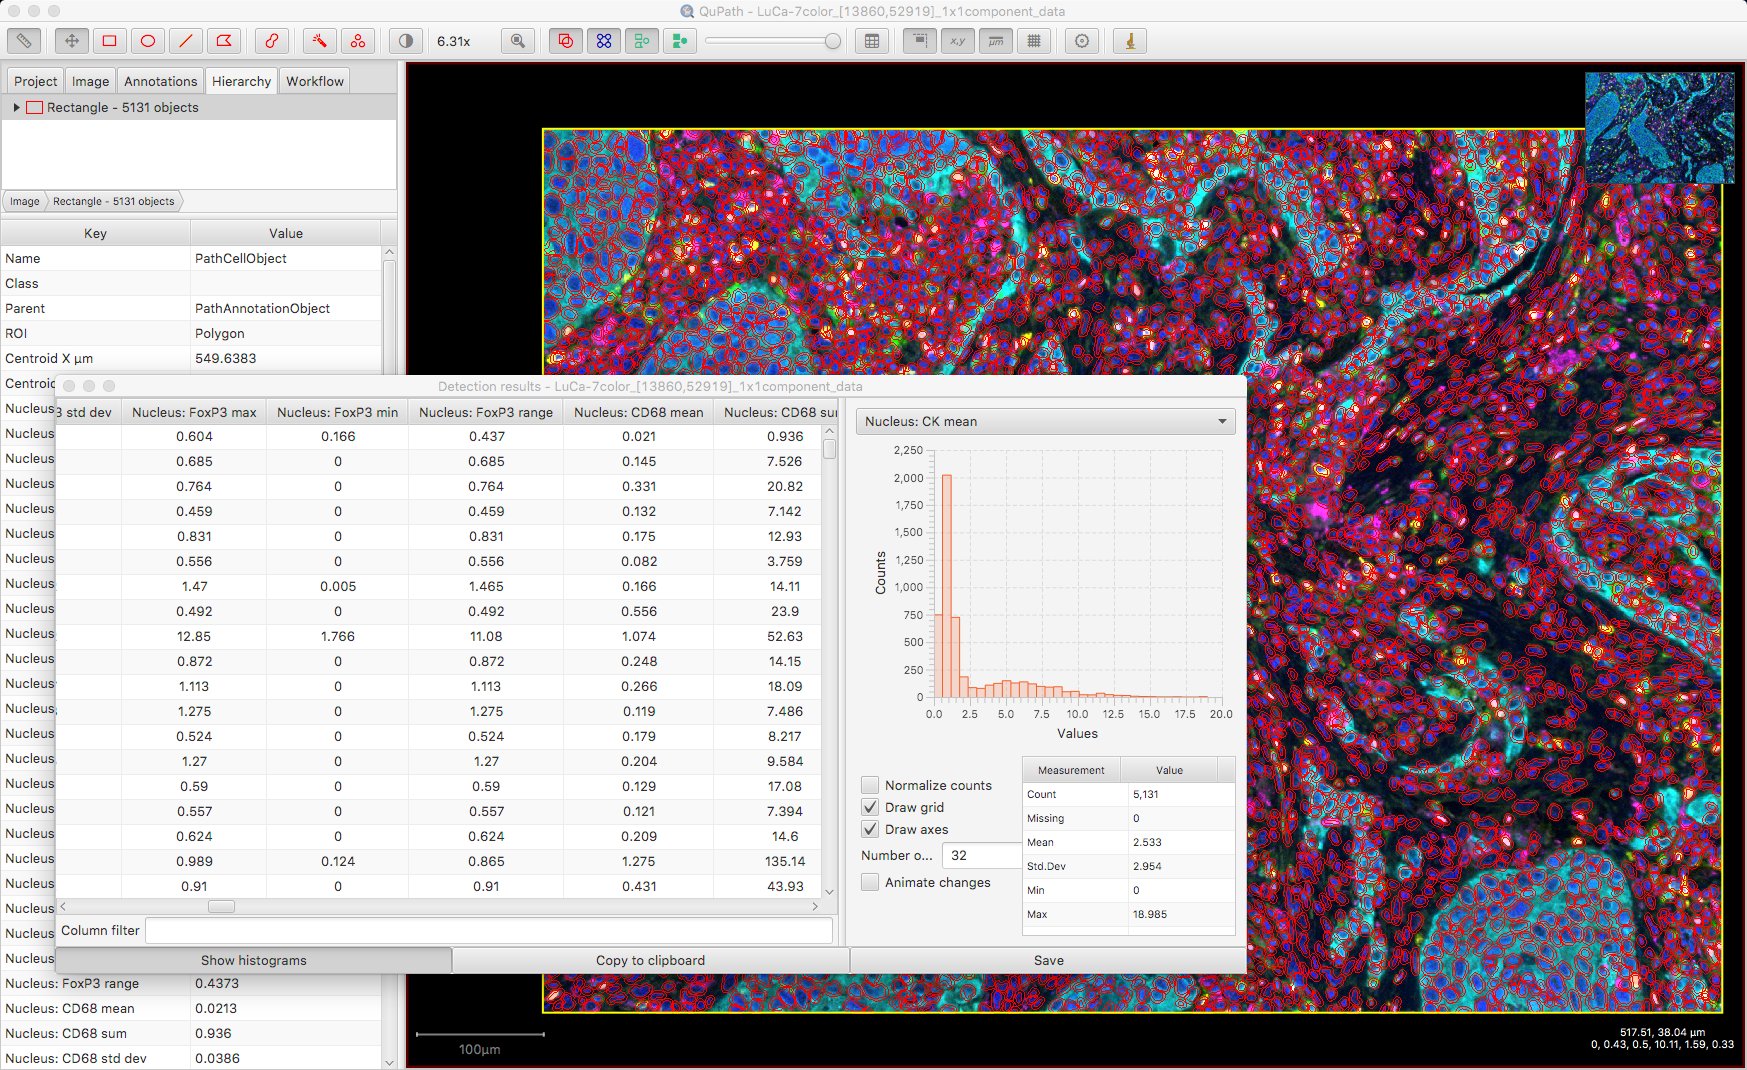
Updating measurement names
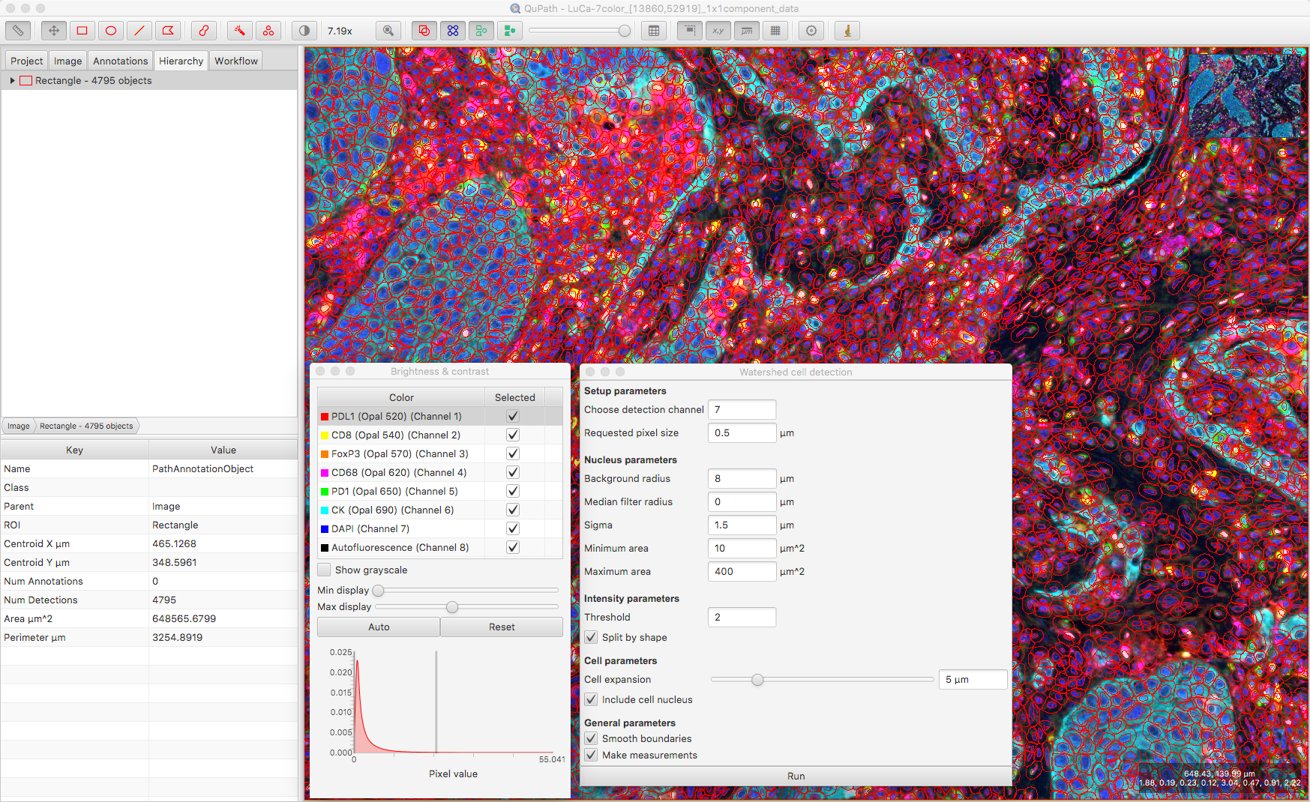
Now I have quite a lot of cells, each with quite a lot of measurements.
Consistency in naming these measurements is important: if, for example, a classifier is trained using certain names, then changing the names (or deleting specific measurements) will cause the classifier to fail.
By default, the channel names for a fluorescence image are ‘Channel 1’, ‘Channel 2’, ‘Channel 3’ etc. – and not the ones we can now access with Bio-Formats.

However, it’s possible to run a script to replace the default channel names after the cells are detected.
Warning! This assumes that the channel names are available and unique… if not, the script could cause some confusion.
Now, the measurements for each cell are more easily interpretable.

At this point, it might be sufficient to simply export a detection measurement table… and QuPath’s job is done. That will provide the individual measurements along with the cell locations, which could be enough to keep an R or Python programmer quite happy.
Classifying by measurements
If you’d like to go a bit further with QuPath, that can also be done.
One way to classify cells is to create a detection classifier. This might be the best option.
However, it is possible to classify cells deterministically based on applying thresholds to specific measurements from specific channels using a script.
A simple threshold is not the only way; more complex scripts can apply more complex logic when performing this classification. But for now we’ll stay simple.
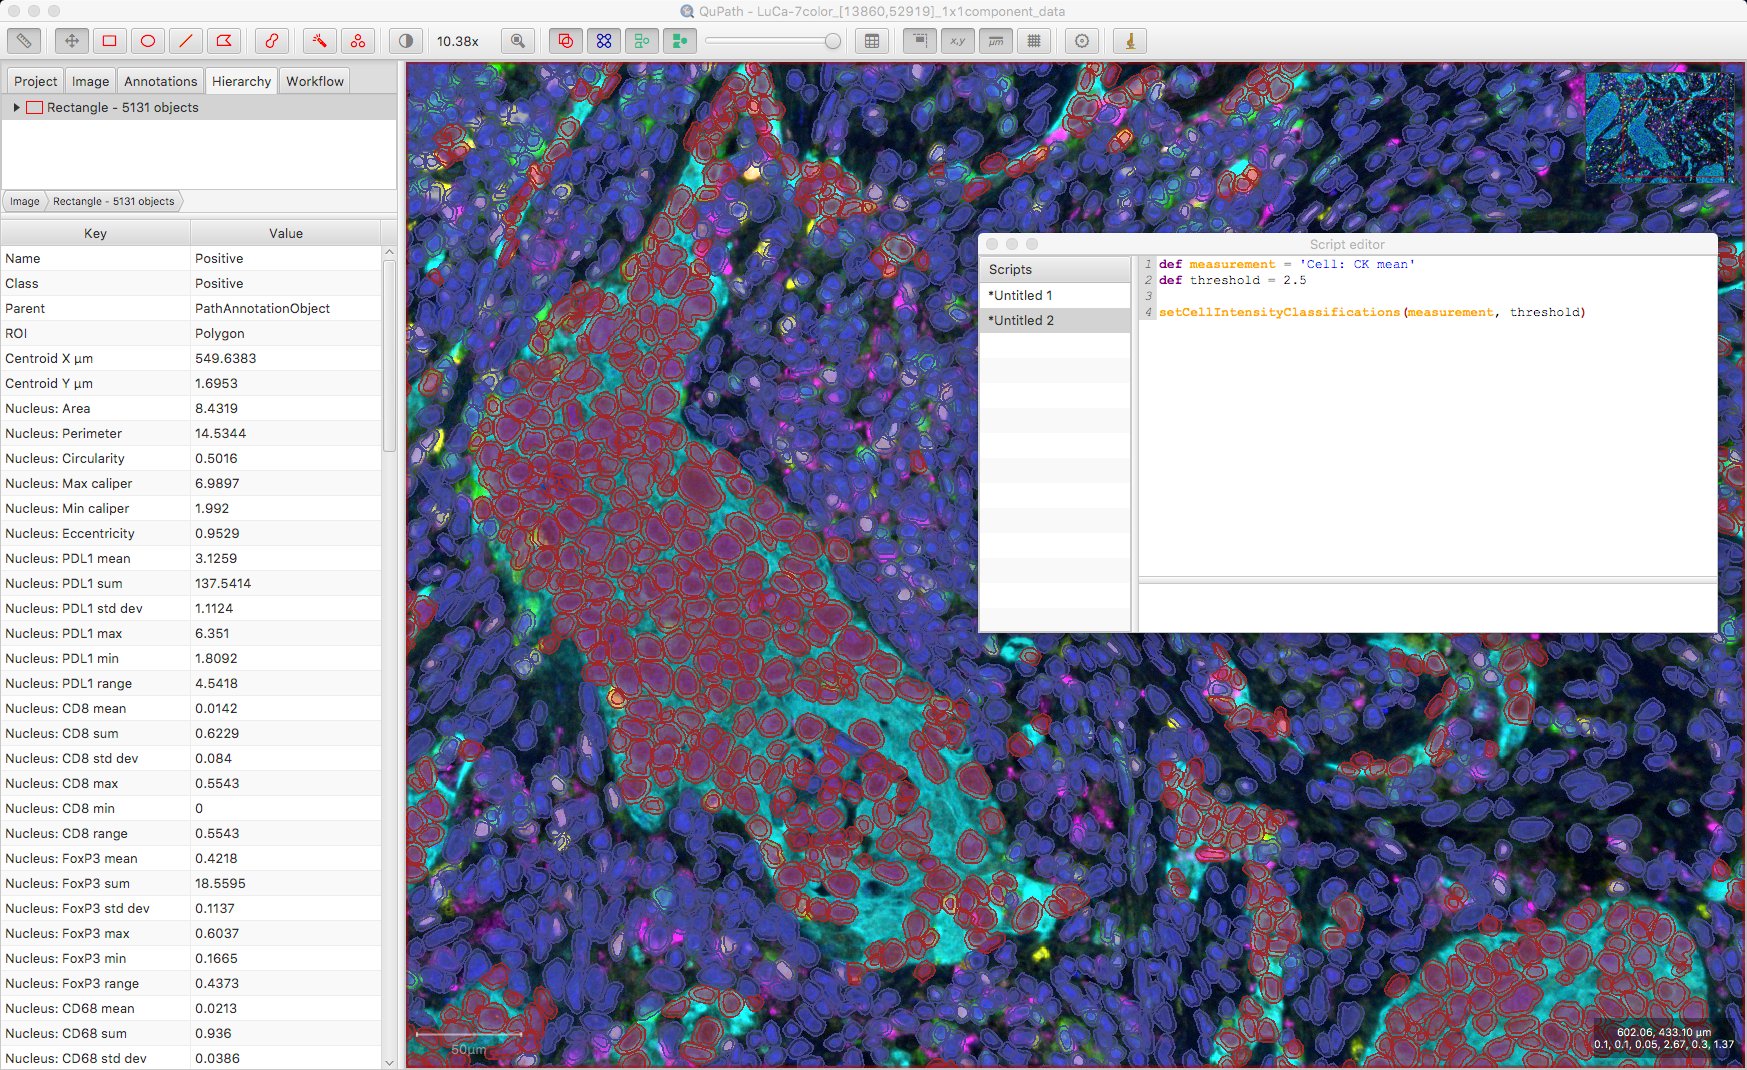
The easiest case involves designating cells as positive or negative based on a single measurement. For example, deducing a sensible threshold for the ‘CK’ channel may be 2.5 (from the histogram above), the following one-line script will use this cutoff to separate cells into Positive and Negative classes.
def measurementName = 'Cell: CK mean'
def threshold = 2.5

setCellIntensityClassifications(measurementName, threshold)
Of course, where there are multiple channels and multiple biomarkers, this is unlikely to be sufficient (a Positive classification means ‘Positive for what?!’).
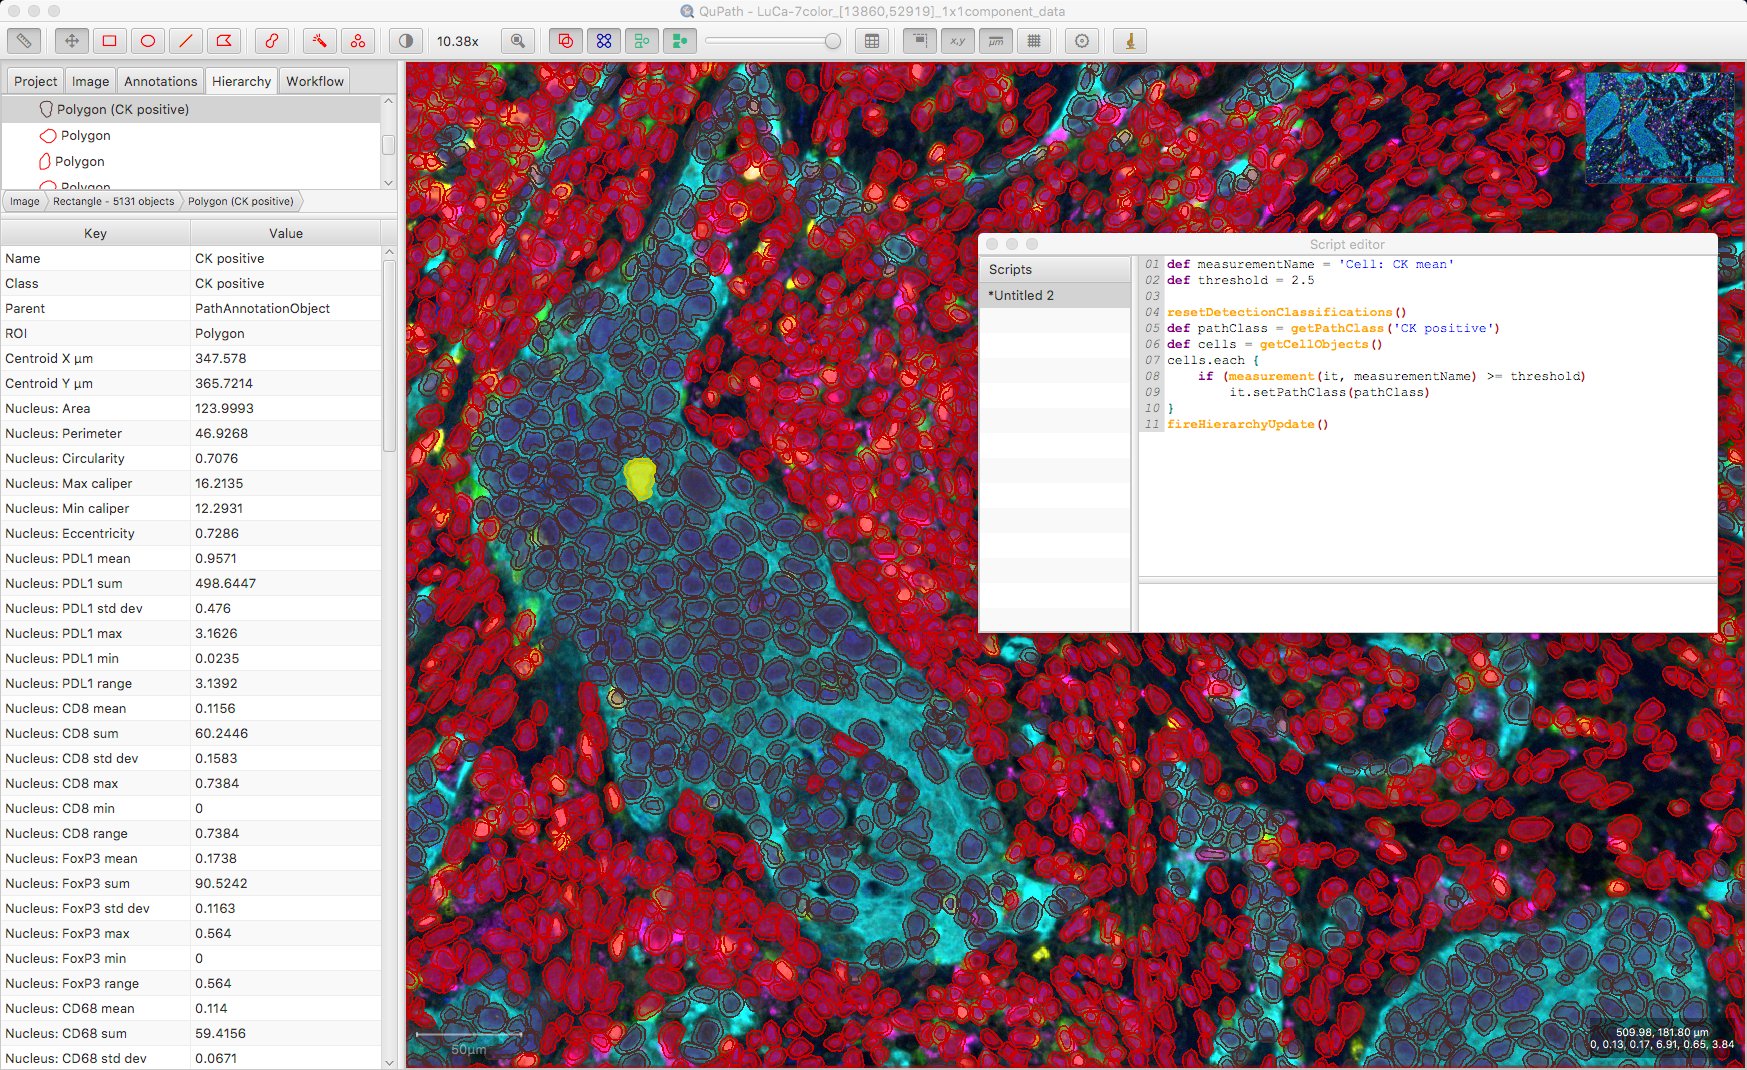
With that in mind, a custom classification script could be preferable, such as this one:
def measurementName = 'Cell: CK mean'
def threshold = 2.5

resetDetectionClassifications()
def pathClass = getPathClass('CK positive')
def cells = getCellObjects()
cells.each {
    if (measurement(it, measurementName) >= threshold)
        it.setPathClass(pathClass)
}
fireHierarchyUpdate()
Potentially we could run several such classifiers to look at multiple biomarkers. To do this, we’d need to remove the resetDetectionClassifications() line so as to not remove existing classifications… but what if we have cells that are positive for multiple biomarkers?
If we just run the code as above, the classification of the cell will only be the last classification. We need some way to represent a cell being positive for multiple markers.
Applying multiple classifications
The trouble is that each object in QuPath can have only one classification.
However, as described on the wiki, this classification might be derived from other classifications. This is what makes it possible to have not only a Tumor class, but also Tumor: Positive and Tumor: Negative classes.
We can repurpose that ability here to derive classifications in different ways.
Important!
In QuPath v0.1.2 and below, derived classifications with more than 2 levels weren’t common, and weren’t handled well – and trying to use the techniques here could lead to errors or misunderstandings.
Please read Part #2 for more details.
The following script does three main things:
- Resets all existing classifications
- Defines a measurement name and threshold parameter for each desired classification
- Loops through the classifications in order, and
- Calculates a threshold to apply, based on the measurements of all cells in the image
- Appends the classification to a cell if its measurement is greater than or equal to the threshold, deriving a new classification (including all relevant classifications) if required
See Reflections on thresholds for more about the method of determining a threshold here.
See Detecting positive cells for thoughts on choosing cell compartments to use pragmatically.
If a cell has a single classification, the color used to depict it is taken from the corresponding channel color; otherwise, if a cell has multiple classifications its color is essentially chosen randomly (but consistently).
Here is the result:
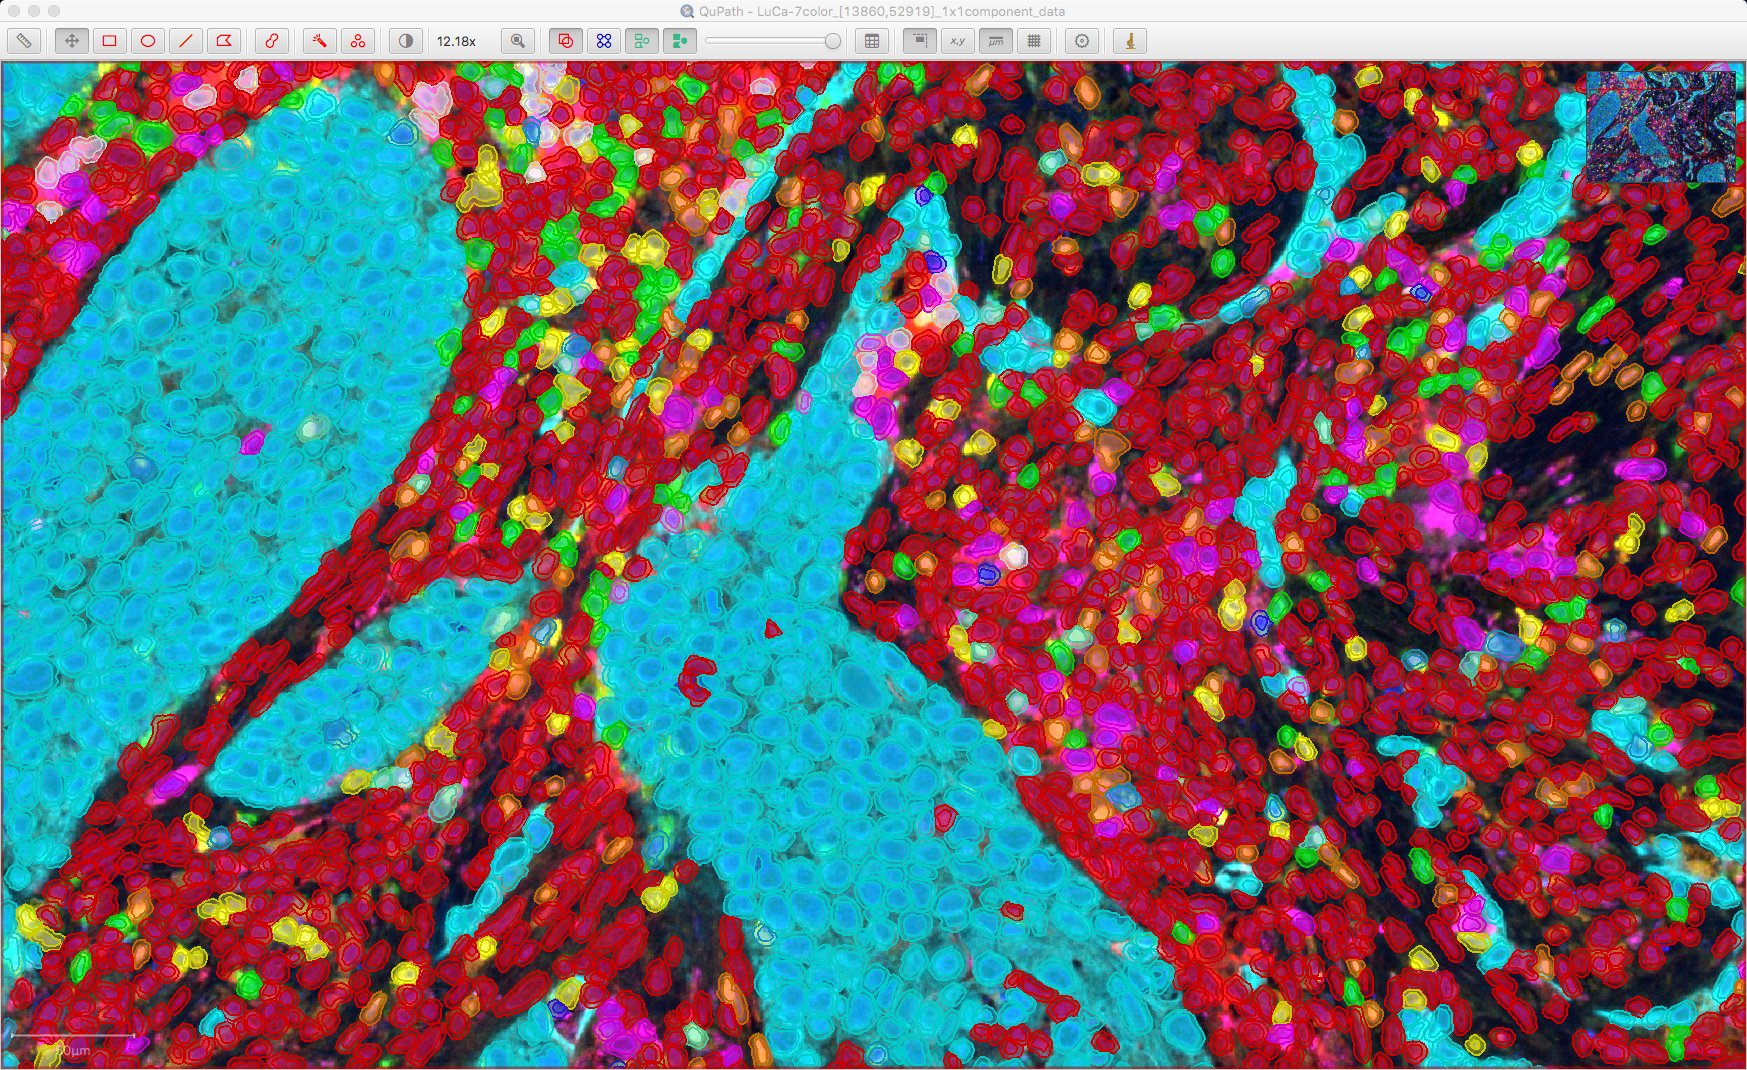
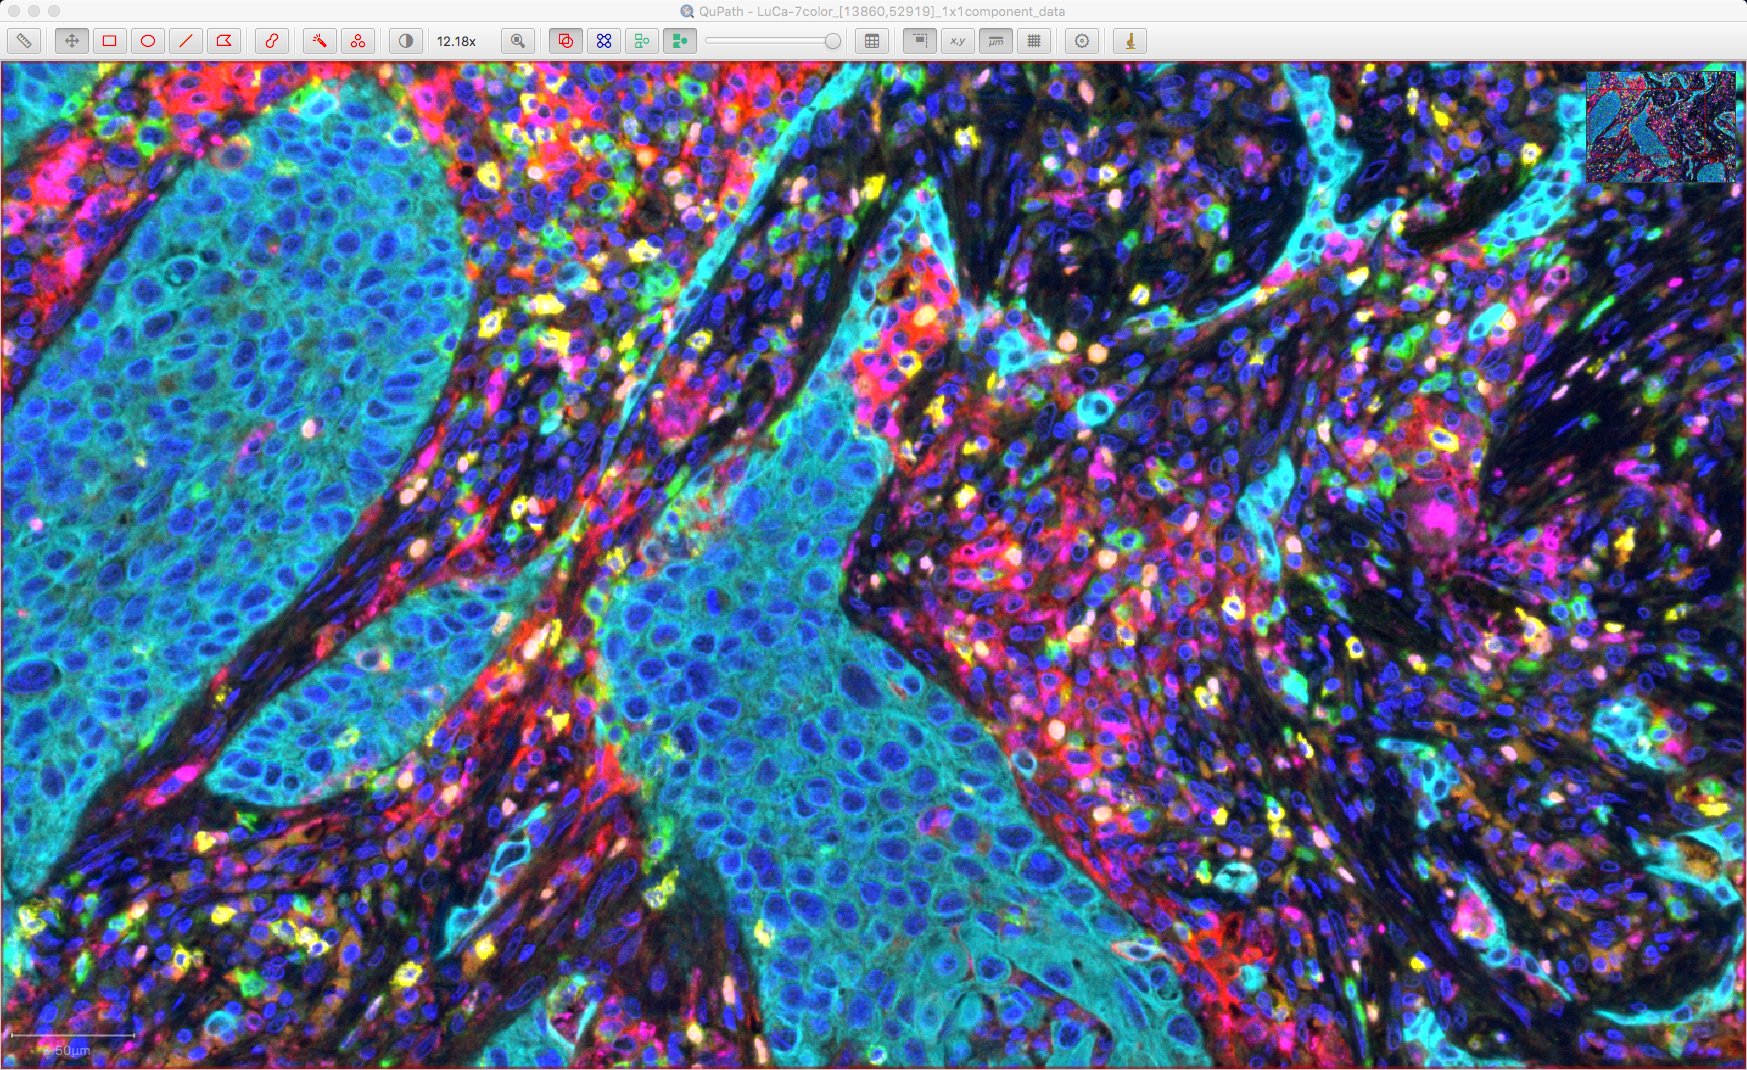
Cells shown as ‘red’ are unclassified, i.e. not considered positive for any of the markers. For reference, here is the original image:
Visualizing classifications
Having got this far, it can be difficult to interpret the results… so many colors, some of them randomly chosen.
Using some of the tricks and shortcuts to apply color transforms can help, such as toggling channels on and off by pressing a numeric key.
It can also help to take advantage of the fact that selected objects are always shown. Consequently, if we hide all cells then select the ones we want in a script, this will show only the detections of interest.
We can toggle the display of the cells with the h shortcut. Here’s a script that will then select cells that have specific classifications, or even combinations of classifications.
Here is the result, looking for CD8 positive cells with only the CD8, CK and DAPI channels turned on.
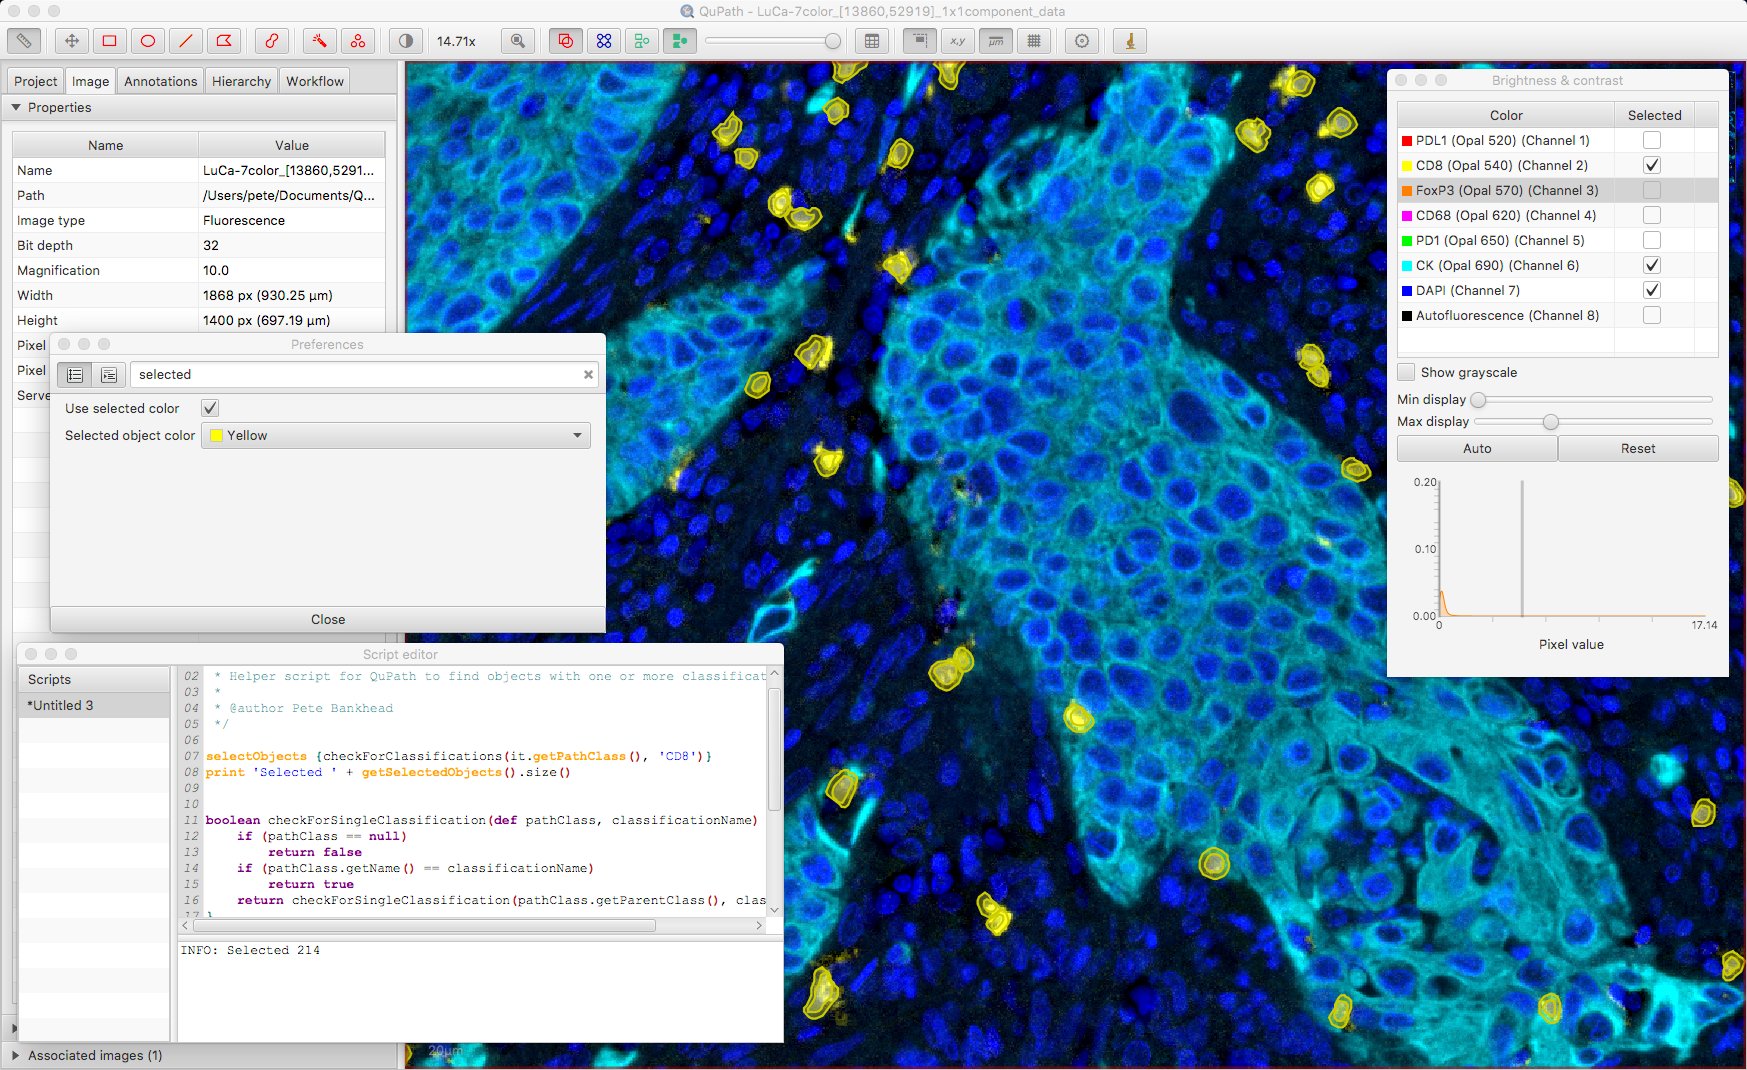
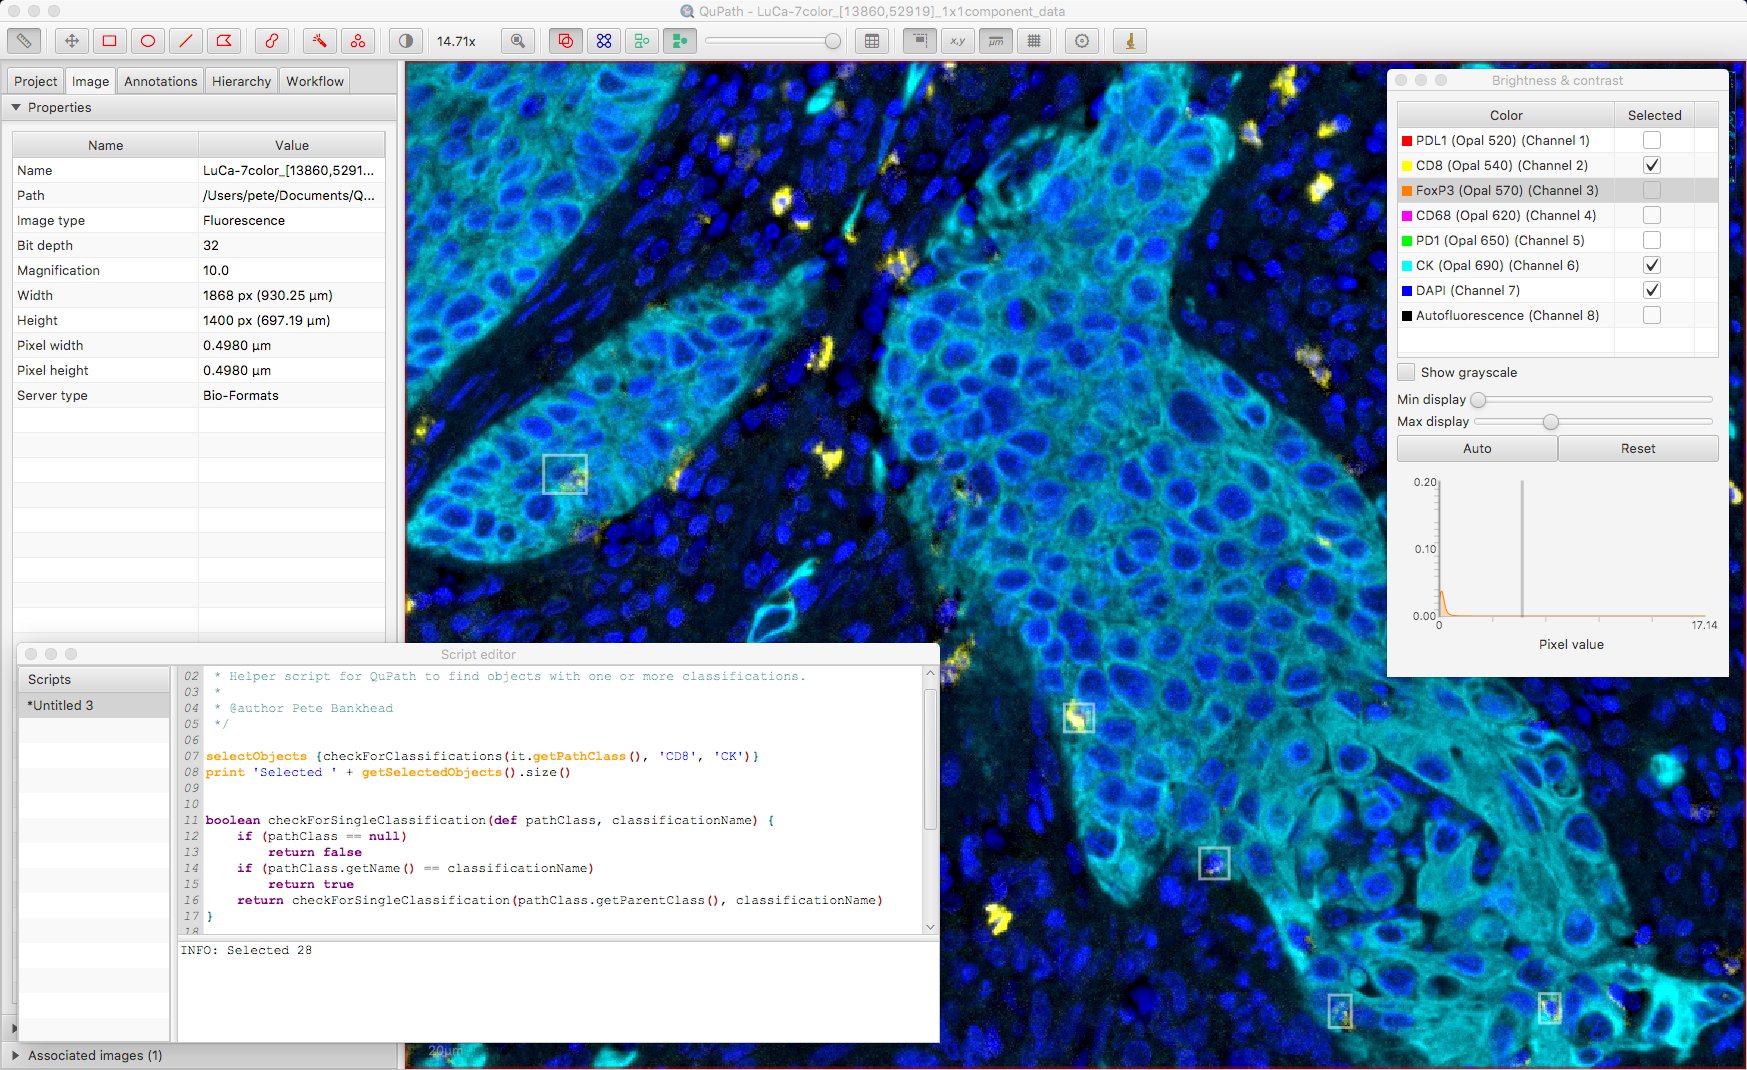
Under Edit → Preferences it’s possible to customize whether selected objects are shown with a specified color or not; if not, bounding boxes are shown instead. Here, bounding boxes might be preferable.

The script also makes it possible to select more than one classification, to show only cells that are deemed positive for both. The ability to switch visualizations helps to discern what exactly this means.
False positives
Applying this approach, you will almost certainly find some ‘impossible’ combinations of classifications… ones that just don’t belong together for a single cell.
Before rushing either to declare a new phenotype or give up on the software in disgust, it is good to check in the image why this has happened. Often, it is because staining from a neighboring cell has snuck inside the cell boundary of the cell that has been misclassified.
Sometimes this might actually be useful, as it encodes some meaningful information about the neighboring cell. Although clearly this needs to be used with caution…
Where one of the classifications is simply wrong, with no redeeming useful quality, there are a few options that may help:
- Change the measurement used for the classifications
- Change the threshold
- Change the cell expansion (during cell detection)
- Override wrong classifications by applying higher-level logic in a more sophisticated script
A longer term solution for the programmatically-minded is to look into developing an alternative cell detection algorithm to run through QuPath, i.e. one that is more specialized for this kind of application than the generic one-size-fits-all approach of QuPath’s default Cell detection algorithm.
Exporting results
Having got this far, you probably want to do something with the results.
As described above, Measurements → Show detection measurements gives a full table of objects, their classifications, their measurements and their centroid locations. This could be exported for further exploration elsewhere.
Measurements → Show annotation measurements provides a table that gives a count for all combinations of classifications. However, you do need to be careful with this because of the differences between QuPath versions described in Part #2.

Future plans
The purpose of this post isn’t to present the right way to analyze multiplexed images with QuPath. Rather, it’s to show what’s possible… and how something that may not initially seem to be possible in QuPath often can be, with minor changes and scripting.
I realize scripting isn’t for everyone. Ideally there would be similar functionality (and much more) within QuPath in the form of a polished and streamlined workflow… although the time required to write that is vastly longer than the time taken for me to write the scripts. It is unlikely to come in the very near future, but I certainly plan that it will come.
In the meantime, I hope this is useful as a first step towards using QuPath for multiplex analysis – and for helping start a discussion about how this should be further improved and refined to meet as many use cases as possible.
Addendum
Reflections on thresholds
Figuring out suitable cutoff thresholds can be crucial at various different stages of lots of different kinds of analysis – from detection, through classification, perhaps also to survival analysis.
It can also be horribly difficult.
When considering thresholds applied to an image, there are two things to consider here.
1. How the threshold is chosen for one image
Subjectively choosing a threshold manually – either by plucking a number out of the air, or some more informed process – can clearly be biased.
With this justification, automated methods to determine the threshold are often preferred. But automated methods are not necessarily any better, and can also easily be biased – due to their underlying assumptions, which the data may not adhere to (e.g. a bimodal histogram). And the user isn’t freed from responsibility, given that their subjective choice of which automated threshold method to apply means they are still directly influencing the results.
For example, Otsu’s method for determining a threshold is widely used in image processing and can give excellent results sometimes… but it expects that there are two classes separable by a threshold. If this isn’t the case, the results can be essentially useless.
2. How the threshold is chosen for multiple images
Clearly, it makes sense for the method of choosing the threshold for one image to be the same for all the images being analyzed together. But what does that really mean in practice?
The easiest approach is to just use the same absolute threshold for every (similarly-acquired) image. The use of such a fixed threshold across all images may be ostensibly more ‘unbiased’ than adjusting thresholds on an image-by-image basis, and it is certainly less laborious. But it isn’t necessarily better since it fails to take staining variations into consideration.
On the other hand, applying the same automated thresholding method to each image has the potential to handle the variations… but it also has the potential to break down completely if the requirements for the automated method to be appropriate aren’t met for all the images.
One method for determining a threshold
Basically, I am not aware of a general approach to determining thresholds that isn’t flawed – although I’d be very interested in how others approach it. It always requires thought on a case-by-case basis, tradeoffs, and a healthy skepticism.
This post also won’t solve the problem, but it will at least show that scripting gives options in QuPath – and one is not limited to just using a hard-coded absolute threshold.
When it comes to distinguishing between a ‘positive’ and a ‘negative’ class based on some numeric value (where high values mean ‘positive’), there are two features of a threshold that I prize particularly:
- It should have some intuitive interpretation and relationship to the actual distribution of the values
- If there truly are no positive examples, the threshold shouldn’t find any
A lot of automated methods fall down on #2, because they assume a (more or less) bimodal histogram – which often isn’t the case in biology. #1 is also hard to achieve.
One very simple method that might sometimes be appropriate is to consider positive cells as outliers; in this case, we could look for cells with measurements that are more than k standard deviations (\(\sigma\)) above the mean (\(\mu\)).
\[Threshold = \mu + k \times \sigma\]This meets criterion #1 (at least if it’s justifiable to consider the background values to follow a normal distribution), and also #2 if k is high enough. It may or may not do well, but it’s a decent starting point.
The following code computes this threshold in QuPath, using Apache Commons Math:
import org.apache.commons.math3.stat.descriptive.SummaryStatistics

def measurementName = 'Cell: CK mean'
double k = 5

def cells = getCellObjects()
def stats = new SummaryStatistics()
cells.each {
    double d = measurement(it, measurementName)
    if (!Double.isNaN(d)) {
        stats.addValue(d)
    }
}
double threshold = stats.getMean() + k * stats.getStandardDeviation()
One criticism of this approach is that the mean and standard deviation aren’t terribly robust here; they are influenced by the presence of the very outliers that we want to detect.
An alternative is to replace the mean with the median, and the standard deviation with the median absolute deviation (MAD). Using the relation of the MAD to the standard deviation (assuming a normal distribution), we can apply a correction so that k keeps the same intuitive interpretation.
\[\sigma \approx \frac{MAD}{0.6745}\]And here it is in QuPath:
def measurementName = 'Cell: CK mean'
double k = 5

def cells = getCellObjects()

def allMeasurements = cells.stream()
        .mapToDouble({p -> p.getMeasurementList().getMeasurementValue(measurementName)})
        .filter({d -> !Double.isNaN(d)})
        .toArray()
double median = getMedian(allMeasurements)

// Subtract median & get absolute value
def absMedianSubtracted = Arrays.stream(allMeasurements).map({d -> Math.abs(d - median)}).toArray()

// Compute median absolute deviation & convert to standard deviation approximation
double medianAbsoluteDeviation = getMedian(absMedianSubtracted)
double sigma = medianAbsoluteDeviation / 0.6745

// Return threshold
double threshold = median + k * sigma

/**
 * Get median value from array (this will sort the array!)
 */
double getMedian(double[] vals) {
    if (vals.length == 0)
        return Double.NaN
    Arrays.sort(vals)
    if (vals.length % 2 == 1)
        return vals[(int)(vals.length / 2)]
    else
        return (vals[(int)(vals.length / 2)-1] + vals[(int)(vals.length / 2)]) / 2.0
}
This method still has some key assumptions (e.g. the shape of the distribution, that most cells aren’t positive), and is not universally appropriate – not even here. It may well also be that no single threshold applied to any one measurement is sufficient, and the search for one will always be in vain. In this case, one can explore other options… like adding extra measurements, or combining measurements (e.g. Nucleus mean - Cytoplasm mean).
Nevertheless, there are two main points here:
- determining thresholds for classification (and other things) is important, but hard
- if you know the way you want to calculate the threshold, this can be scripted in QuPath
There are further thoughts on thresholds, and in particular the value of checking out histograms, under Detecting positive cells.