QuPath updates!
Lots of QuPath updates & improvements! Read how to try them out now.
The first post on this blog described the current QuPath situation and promised updates. This post describes those updates and how to try them out.
In the first few months after QuPath was released, it was updated often - almost frantically - as the clock ticked down on my time at the university. To get the changes, it was a matter of going to the website and downloading the software for whatever platform you were using (Windows, Mac, Linux).
It was easier then, because QuPath was fairly undiscovered and changes didn’t affect all that many people. It also hadn’t yet been published in any journal.
But now for more than a year v0.1.2 has been the current version, and it’s widely used - having been part of the analysis in numerous published studies.
This makes creating updates a bit of a bigger deal than it was before. And before diving headlong into making a new version available, I’d like to show where to access changes early.
April 2019 update: These changes - and much more - are being included in the next major release of QuPath, v0.2.0. See here for more details.
A forkful of improvements
Rather than feeding back changes into the main QuPath repository immediately, the ones I’m making are kept separate for now on my own fork at https://github.com/petebankhead/qupath.
April 2019: Rather than feeding back changes into the main QuPath repository immediately, the ones I’m making are kept on a separate branch at https://github.com/qupath/qupath/tree/v0.1.3.
These changes are likely to end up in the ‘official’ QuPath, but this might take some time.
Because many users are applying QuPath in ways that I never had (which is great!), feedback is really helpful for me to know what works and what doesn’t.
What’s new?
Here are some of the highlights of the recent changes. Full details can be seen in the commit log.
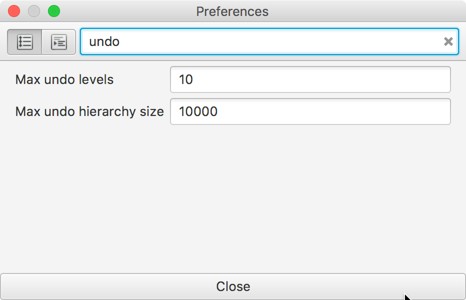
New (limited) support for ‘undo’!
Undo has been a much-requested feature (e.g. #75). Until now, I always found excuses for why it wasn’t there… mostly connected to it being difficult to add, and potentially having a very negative impact on performance.
The suggested workaround was a combination of:
- Using File → Save and File → Revert instead
- Reversing the steps taken where possible… e.g. after accidentally drawing an annotation, press backspace to delete it
- Just not making mistakes in the first place
Recently, I started to really need undo myself. I experienced how annoying it is to have no undo option - especially when drawing very detailed annotations. That gave extra motivation to figure out some kind of solution.
Now there is finally an option in QuPath to undo & redo
The challenges and concerns about performance still remain, so it’s only a partial solution. Specifically, undo only applies to changes made to the object hierarchy (e.g. adding/removing/moving objects), and only when the hierarchy doesn’t contain many objects. Internally it works by copying the entire object hierarchy every time there is a meaningful change… so it’s not tremendously efficient.
Consequently, the ability to undo changes switches off automatically when the hierarchy gets large. Otherwise it could really slow things down a lot and require a huge amount of memory.
Still, it’s hopefully better than nothing.
‘How large’ the hierarchy can be before undo switches off is an option in the preferences. As a rough guide, a few thousand objects objects is probably ok, but a few hundred thousand isn’t.
It’s also possible to specify the number of levels of undo. Sometimes you might find you have to choose undo twice to revert what feels like a single change. That’s because internally there might really be two changes applied (e.g. QuPath might move an object in two steps: by removing it first, then re-adding it elsewhere).
Improved annotation tools & tricks
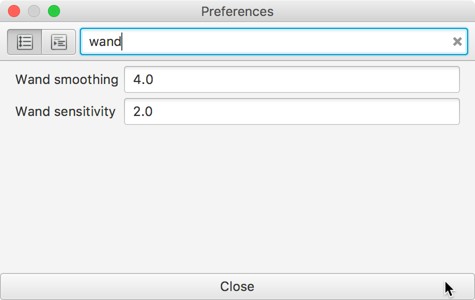
A new sensitivity preference has been added for the Wand tool, and better defaults make the Wand slightly more controllable.
An extra trick has been added to help when using the Brush or Wand: holding down the Shift key turns on ‘avoid’ mode. This prevents drawing over existing nearby annotations.
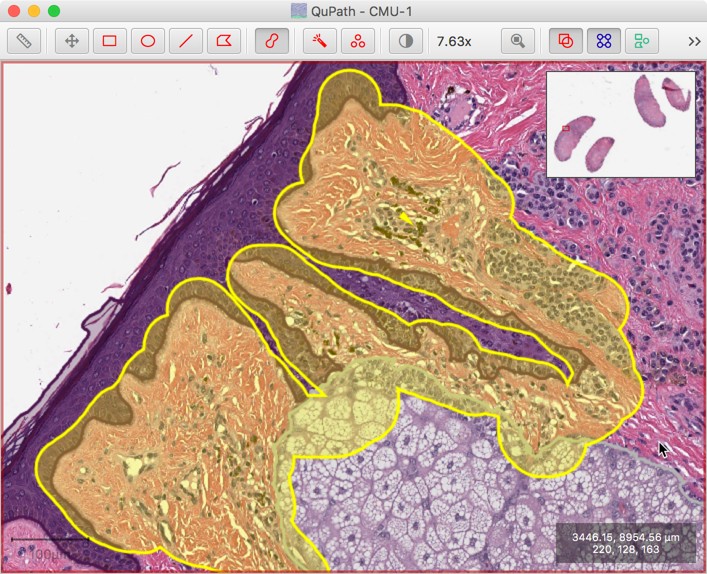
A use case: suppose you want to annotate regions that border one another. You might begin by annotating some structures very carefully, and now you want to get the rest.
You can do that by first annotating the nearby space very coarsely, with lots of overlaps…
…and then instantly clean this region up simply by pressing the shift key while continuing to draw with the brush or wand nearby.
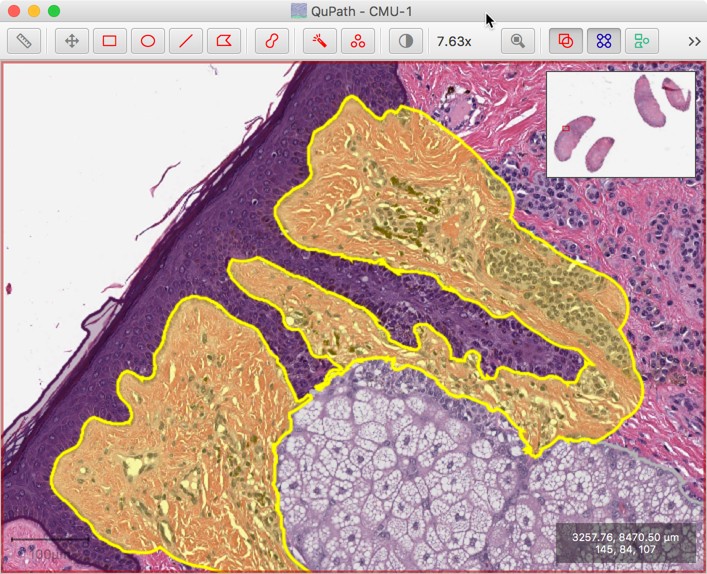
The overlapping parts will be automatically subtracted as the cursor moves towards a nearby annotation, as long as Shift is pressed while drawing.
Easier method to create new projects
The process of creating a new project by pressing Create project annoyed my impatient self.
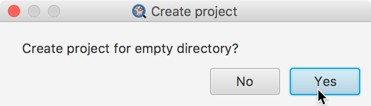
Now, to create a new project quickly, simply make an empty directory somewhere (e.g. in Finder or Windows Explorer) and drag it onto QuPath. QuPath will ask if you want to create a project in the directory.
Once you have an existing project, you can also open it by dragging the directory onto QuPath.
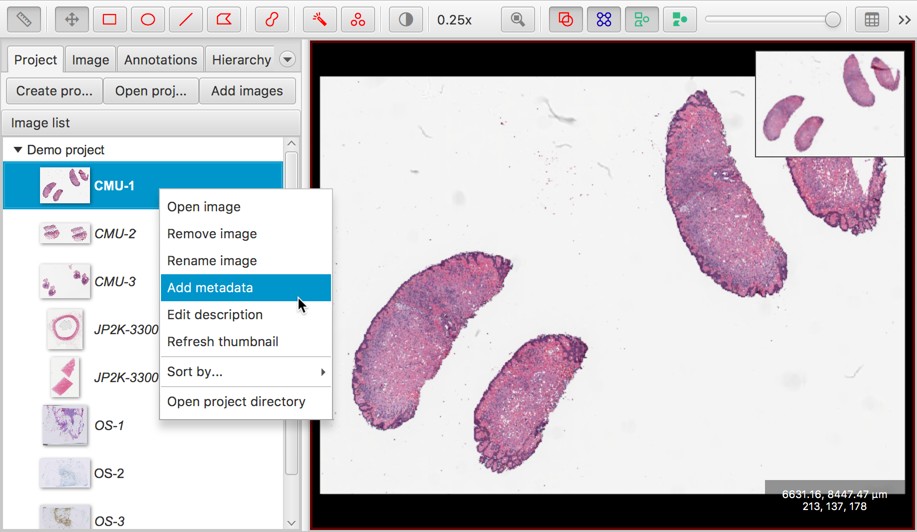
Better tools to manage projects & metadata
Projects containing large numbers of images can become unwieldy.
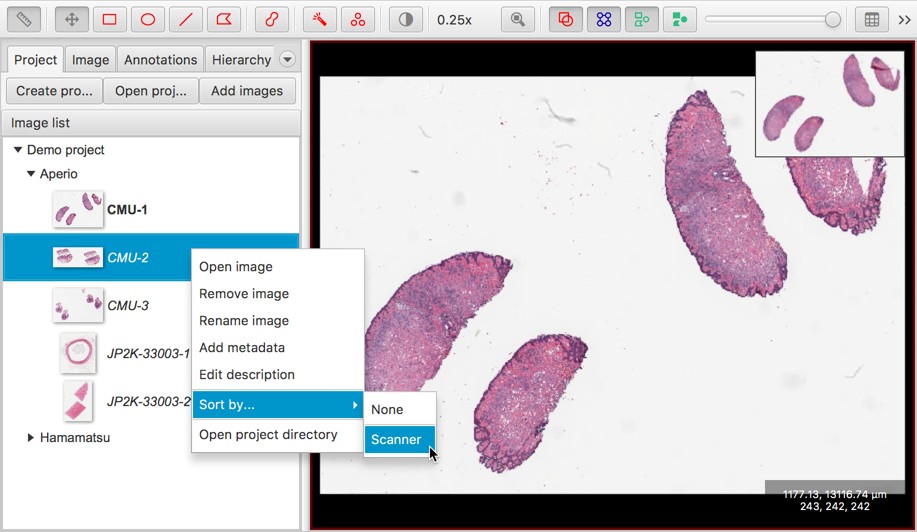
Now, right-clicking on the list of images introduces new options.
One such option is the ability to set metadata for each entry:
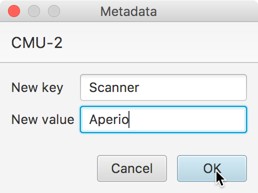
After setting the metadata value for any individual image, File → Project… → Edit project metadata can be used to edit it for other images more efficiently.
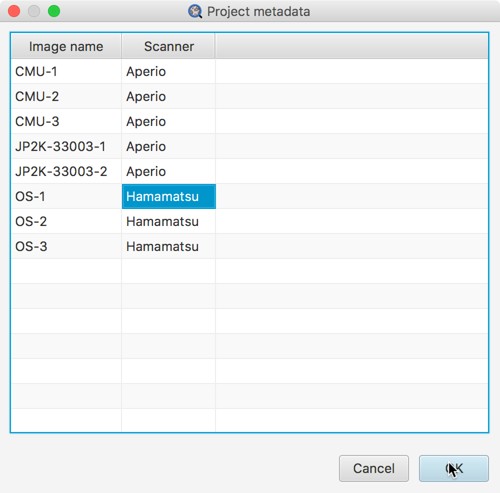
A good reason to set metadata values is that it’s then possible to sort the project entries by any metadata key. This is handy if (for example) you want to have images stained for different biomarkers in the same project, or from different scanners, and be able to group them.
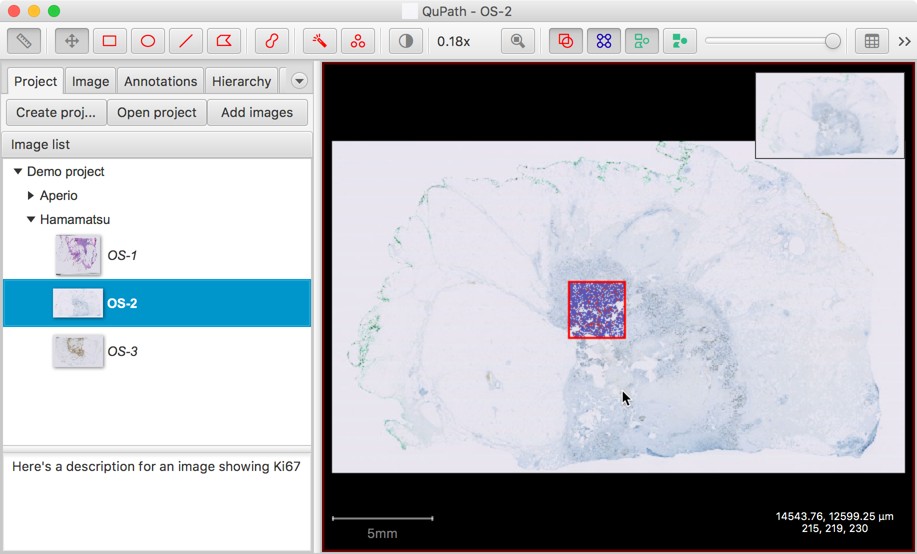
The screenshots above also show two other changes:
- The style of text in which the image name is shown conveys extra information:
- Bold indicates the image is currently open & selected
- Italics indicates that the image isn’t open, and has no data file associated with it
- ‘Normal’ indicates that the image isn’t open, and does have a data file associated with it
- There’s a new option to Edit description. This gives a place to store extra information about slides, which can be viewed without needing to open them fully in QuPath.
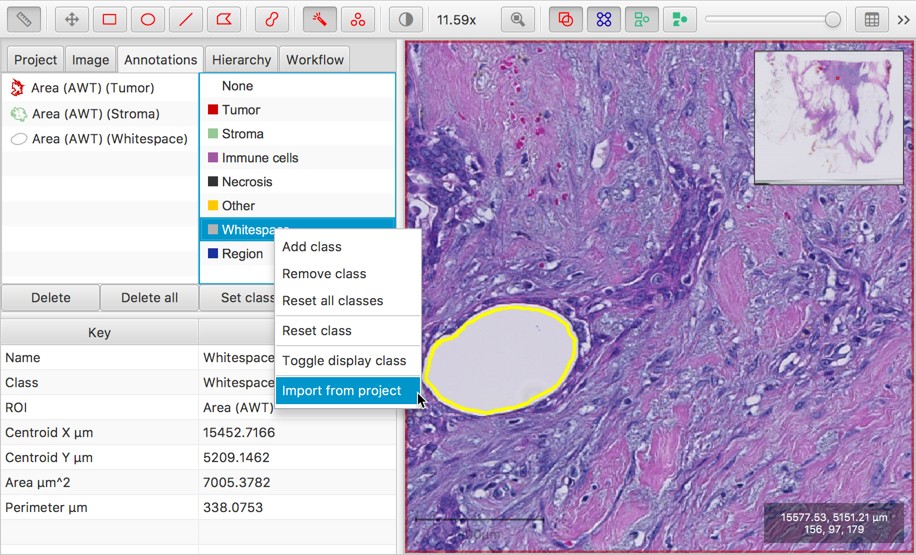
Classification lists are stored in projects
The available classifications were previously only stored in the preferences, which meant that if you wanted different classifications for different projects you’d need to either manually change the list each time, or have one mega-list to try to handle everything.
Now, the classification list is saved inside the .qpproj file of a project. A list can also be imported from another project if needed.
Better support for 2 stains + hematoxylin in brightfield images
When running Cell detection, measurements are now made for up to two stains (in addition to hematoxylin), when the image type is Brightfield (Other).
Previously, only one stain was supported (generally for H-DAB or H&E). This change deals with some of the points described in #73.
The Create cytokeratin annotation command is also now less fussy about being applied to hematoxylin & DAB staining only. It effectively becomes a general thresholding tool giving two annotations:
- One for the ‘tissue’, based upon the sum of all the stained channels
- One for the second stain, whatever that may be
The behavior is the same as previously in the special case where Stain 1 is hematoxylin, Stain 2 is DAB and Stain 3 is a residual (i.e. no additional stain).
The ‘cytokeratin’ element is a bit of a historic legacy now… but it explains why the regions generated are automatically classified as ‘Tumor and ‘Stroma’. These classifications may need to be changed afterwards if they are inappropriate.
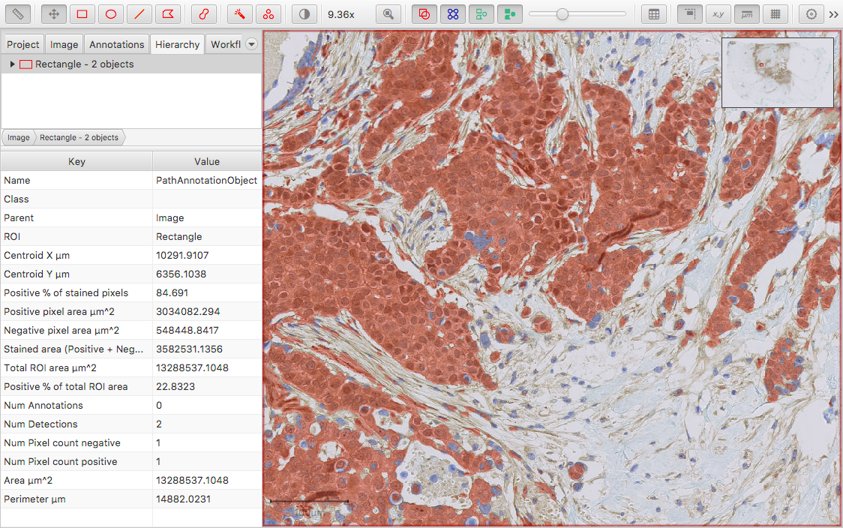
More useful output for Positive pixel count (experimental)
Simple area measurements of positive (generally brown) staining are widely used and useful… much more so that I had initially anticipated.
The Positive pixel count (experimental) command can be used for this purpose, but its implementation was never particularly nice. This was the old dialog box:
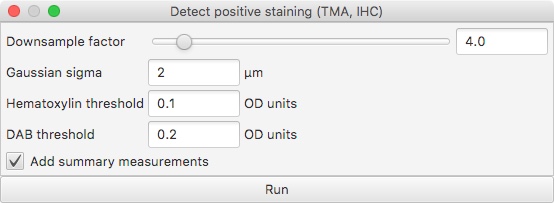
And here is an example of its output:
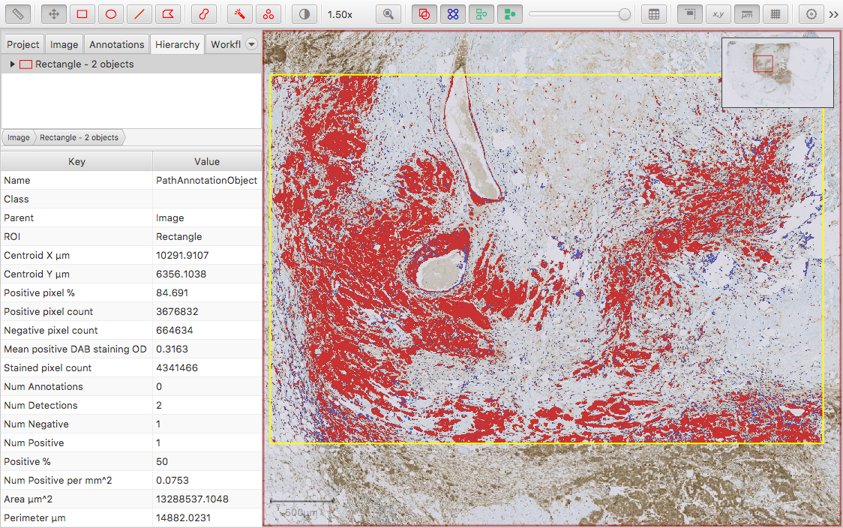
There are a few things that aren’t great here:
- The Downsample factor option is used to control the resolution at which the image is processed. Unfortunately, the ‘pixel counts’ are generated at this resolution too - and so changing the Downsample factor results in counts that are not comparable (even if their ratios remain comparable).
- There is a pretty meaningless Positive % measurement automatically generated, which is typically ‘50’. This just means that there is one Positive object and one Negative object.
- The most meaningful measurement is Positive pixel %. This is based upon the ‘positive’ and ‘negative’ staining (typically DAB and hematoxylin respectively). But the ‘negative’ staining idea is not necessarily very appropriate, and it may be preferable to take the percentage of the full ROI area stained positive as a final output.
Better values can be calculated from these outputs, but it takes more effort than it should.
Tempted as I was to change this command more dramatically, I realise that people may rely on how it works currently. Therefore the slightly updated version here endeavors to provide backwards-compatibility - performing the same calculations, but giving better outputs.
Here’s the new dialog box:
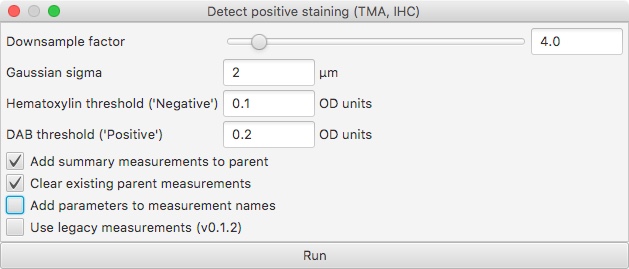
Firstly, you can see the bottom option to Use legacy measurements (v0.1.2). This can be applied to revert fully to the ‘old’ behavior.
Apart from that, the other options can be explored to see what outputs they give. An example:
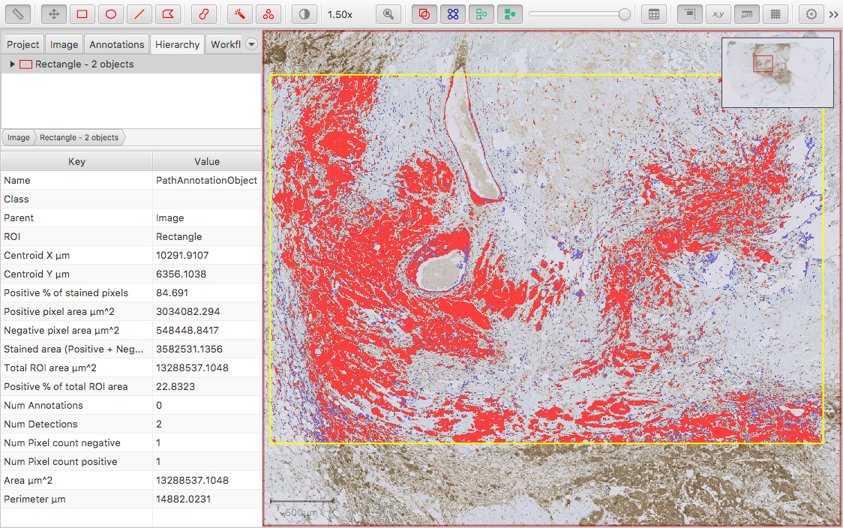
Some things to note:
- The areas are now given in µm^2 - and therefore (reasonably) comparable, regardless of the Downsample factor.
- The new Positive % of stained pixels measurement is comparable to the original Positive pixel % measurement from the old command.
- A new Positive % of total ROI area is added based upon the area stained positive and the full ROI for which the command was run.
- The colors are slightly different, because the classifications are no longer simply Positive and Negative - which is what was triggering the unnecessary (and potentially confusing) Positive % measurement previously.
If you used the old command, I hope you prefer the new one. Please do let me know if it is an improvement, or where it could be made better.
Improved support for fluorescence images
Updates to the Bio-Formats extension had already improved support for fluorescence whole slide images, but several new changes have been made:
- Browsing fluorescence images, especially 16-bit images, should be much smoother and more responsive.
- Better thumbnails are now generated when adding fluorescence images to a project; previously, these would often show as all black, because of bad contrast settings.
- Changes to the brightness/contrast settings for each channel of a fluorescence image are now stored in the .qpdata file, and therefore preserved when the image is reloaded (#26).
Note: It’s also possible to adjust the brightness/contrast settings and update the thumbnail for a project - just right-click on the project entry and choose Update thumbnail.
Detections can be hidden in the Hierarchy tree
That little ‘tree’ view under the Hierarchy tab can really be a performance pain whenever there are a large number of objects in the hierarchy. It takes a lot of effort to keep it synchronized - especially with objects being selected/deselected. In the worst cases, it can bring QuPath to a halt (#41).
If you find this happening, switch to exclude the detections from the view by right-clicking on the tree and choosing from the available display options.

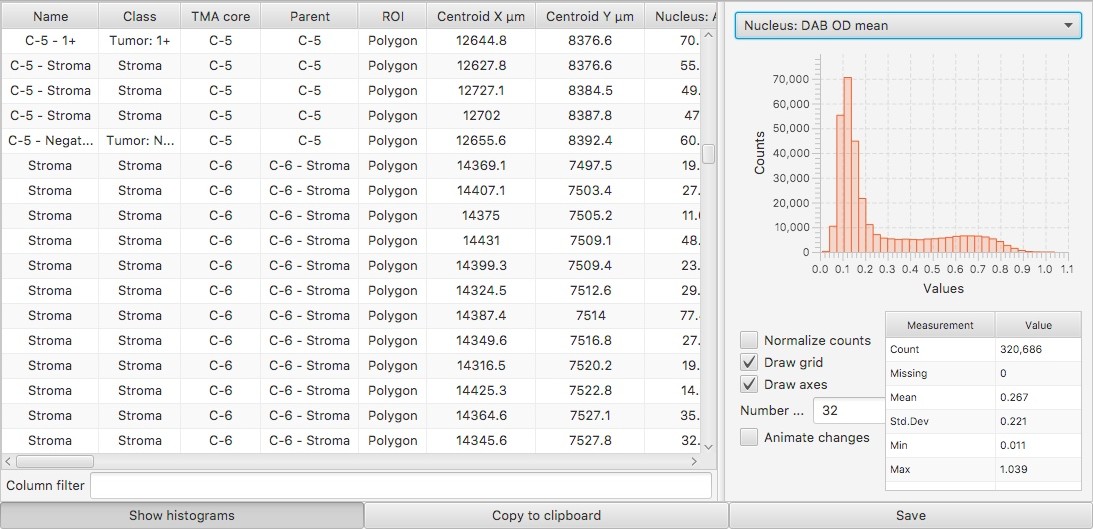
Detection & annotation measurement tables include parent names
Measurement tables for detections & annotations now include an extra column giving the displayed name of any parent annotation, and also of any TMA core they might be inside (#59).
Fast opacity adjustment
I find the ability to quickly toggle objects on and off with shortcut keys really useful.
There’s also an opacity slider above the QuPath viewer, but it takes mouse action to do anything with it.
Now there’s a fast way to adjust the opacity: simply scroll up or down while pressing the Ctrl key (Windows) or Cmd key (Mac).
This can be especially useful with the Positive pixel count command.
Gamma transform option (display only)
The gamma transform is a non-linear color transform that is sometimes applied to images for display. This is now available within the QuPath preferences.
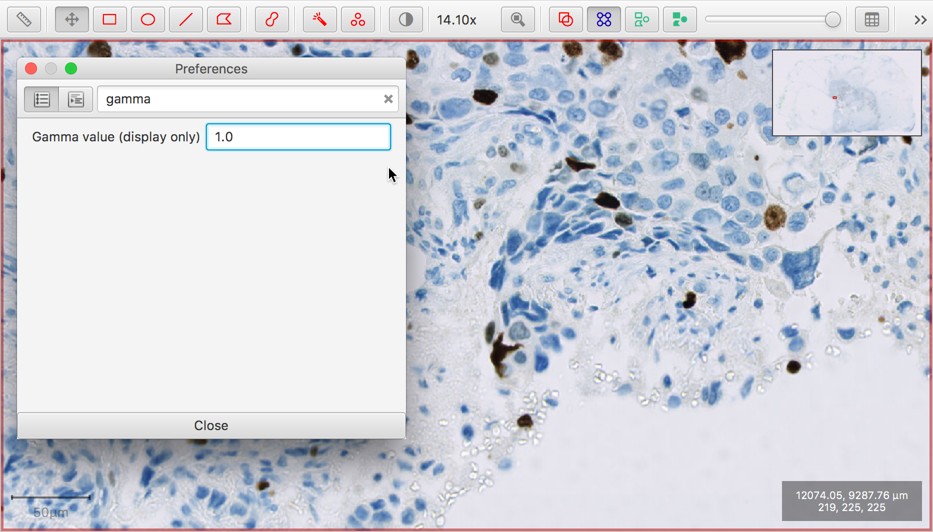
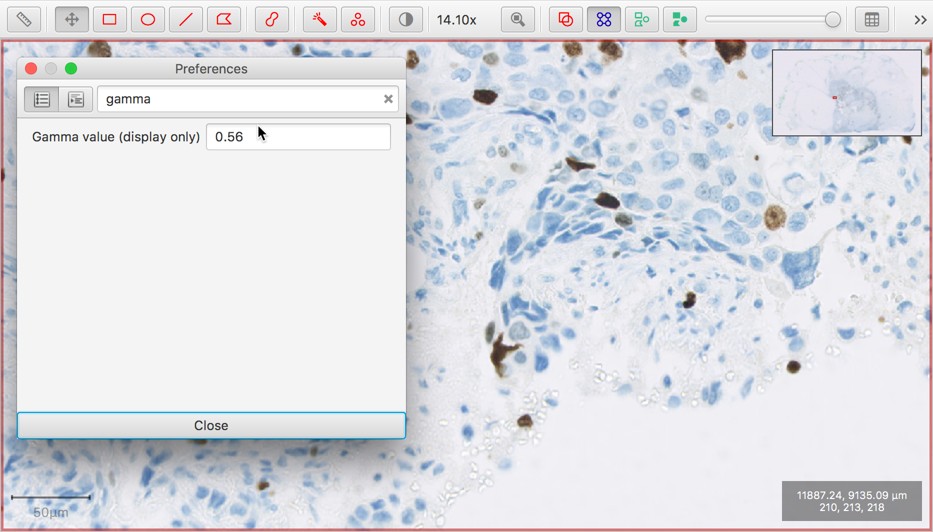
Use this option with caution!
It’s generally best to avoid applying extra color transforms unless you know what they do and have a good justification for using them… but sometimes they are appropriate and useful.
The default gamma value is 1 (leaving the pixel values unchanged).
Modifying this value will affect the display of all images until it is reset to 1.0. But the underlying pixel values (and therefore results of processing them) are not affected.
Many bugs & annoyances fixed!
Most of the main troubles I know of in v0.1.2 are fixed. Here’s a (non-exhaustive) list:
- Straight line ROIs are no longer shifted when reloading previously-saved image data #71
- When (programmatically) using sub-sub-classifications, all elements are now displayed through the user interface (rather than only the final two) #39
- The number of points in a Points ROI is now shown in measurement tables (it was always supposed to be…)
- Windows-friendly line separators now used when exporting results on Windows (which helps them display more sensibly in other applications)
- Logged commands when exporting measurements now have a proper
name.txt, rather than a dotlessnametxt#125 - Fixed bug that sometimes stopped the classifier updating when changing type (e.g. Random Trees to Decision Trees and back) until annotations were changed
- Parallelization weirdness when running certain commands on non-whole-slide images read with ImageJ is fixed #74
- Scripts now use UTF-8 encoding; this fixes Windows bug where the µ symbol wasn’t reloaded properly in the Script editor
- It’s now possible to calculate intensity features when no pixel size information is set, and also to display ROI centroids #154
- Trying to create an ImageJ snapshot without an image open no longer gives an error
- Setting the ImageJ plugins directory through the preferences now works, even if it wasn’t previously set #91
- Fixed Positive pixel count bug that required at least one ‘hematoxylin’ pixel for each region #67
- Create tiles now locks the parent annotation automatically, which better matches the behavior of similar commands #50
- When setting the classification through the circle menu with a Shift + right-click, a bug that meant the ‘click zone’ for neighboring classifications sometimes overlapped (occasionally giving unexpected results) is now fixed
- Much faster performance when removing large numbers of objects from a hierarchy
- Fixed bug that occurred if subtracting annotations resulted in an ‘empty’ annotation, whereby a small square was displayed in the top left corner #78
Special thanks also go to @lacan for the following changes:
- Much more sensible size limit is applied when exporting image regions to ImageJ #133
- Better image names are given when multiple images are stored in the same file (common with some formats supported by Bio-Formats)
Building QuPath
That was the good news.
I hope that if you use QuPath you will want to try these out.
I’m afraid I now have to tell you the small piece bad news: there isn’t a simple installer to download to try out QuPath with these changes.
Rather, it’s necessary to create your own executable version: a process of building the software.
But please stay with me even if you don’t like the sound of this… it’s really not that bad.
‘Building software’ has a reputation for being an horrendous task.
However, a further change not mentioned above is that QuPath is now built with Gradle rather than Maven. This switch means the process should now be (almost) completely painless. All being well, it should be possible to generate a shiny new QuPath beta version ready to try in just a few minutes.
What’s more, this method lets you get further updates much more quickly - and even to switch back and forth between versions.
This gives a mechanism to try and discuss possible new features on this blog, before deciding whether or not to keep them in the software for everyone.
Step by step guide
The following steps are for Windows (because most QuPath users seem to be using Windows).
The steps for Mac and Linux are almost the same, except that gradlew.bat should be changed to ./gradlew
1. Download a Java 8 JDK
Search for a ‘Java 8 JDK’ to download and install.
In the steps below, I used the JDK from the Oracle website; at the time of writing, the latest version is JDK 8u162.
Tip #1: Make sure you get a Java 8 JDK - Java 9 and later won’t work here!.
Tip #2: Beware of versions 8u151, 8u152 and 8u161 - they contain a bug that prevents them from creating the executable versions of many JavaFX applications (including QuPath). Previous JDKs (up to 8u144) did work, and 8u162 seems to work; presumably later versions will work too.
For an explanation of why there are two different ‘current’ JDK versions to download from the Oracle website, see here.
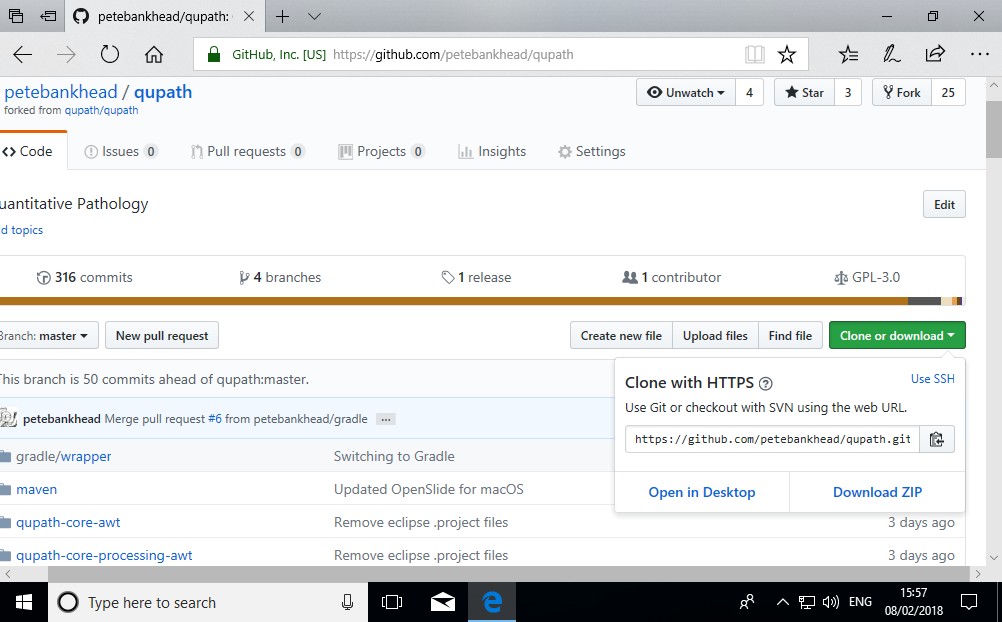
2. Get GitHub desktop
Download and install GitHub Desktop - you can get it from http://desktop.github.com
3. Download the QuPath code
Get the QuPath code from https://github.com/qupath/qupath/tree/v0.1.3 by pressing the Clone or download button and selecting Open in Desktop.
April 2019: The location of the code has moved since these screenshots were made. Within GitHub Desktop, click the ‘Current branch’ button at the top, and make sure ‘v0.1.3’ is selected.
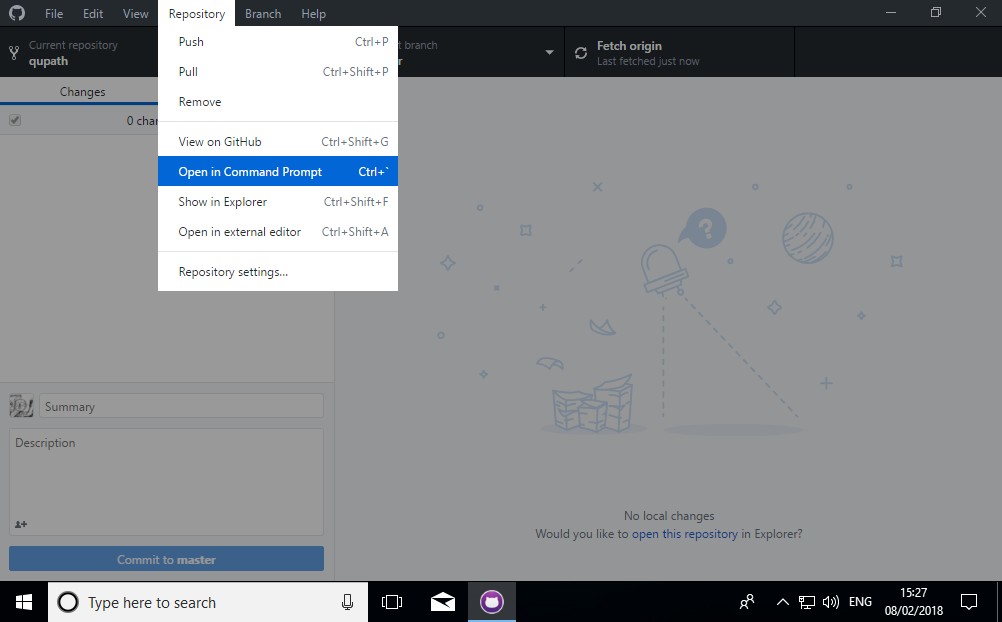
4. Find the QuPath code using a command prompt
This should be easy from GitHub Desktop through the Repository menu.
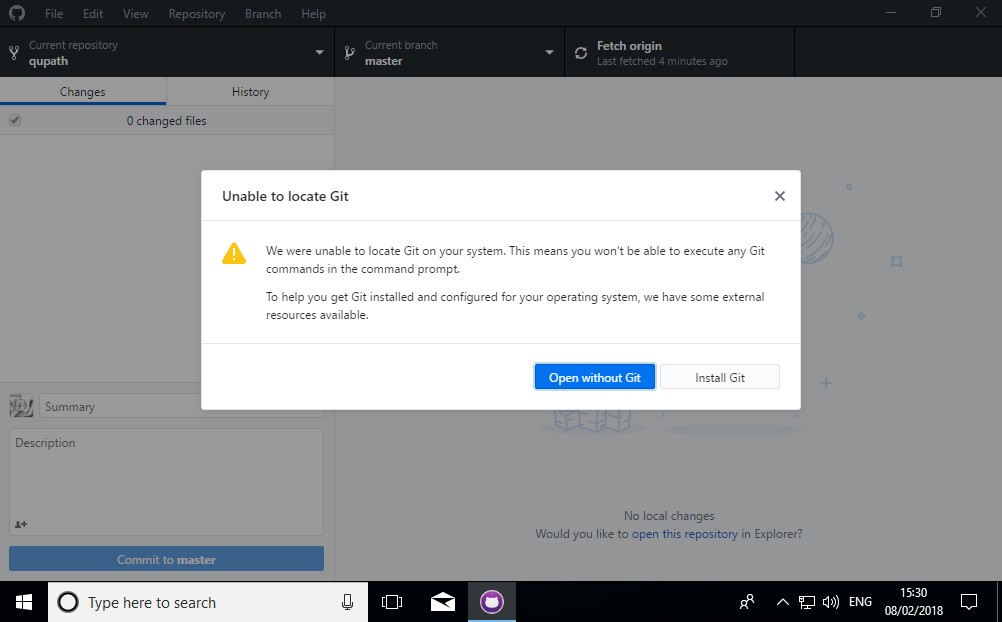
5. Install Git… or just don’t
You’ll probably be asked if you want to install Git. It isn’t needed here, so you can choose Open without Git. But there can be advantages in having it (see the QuPath building tip below).
6. Create the QuPath executable
At the command prompt, type
gradlew.bat jfxNative
and press Enter.
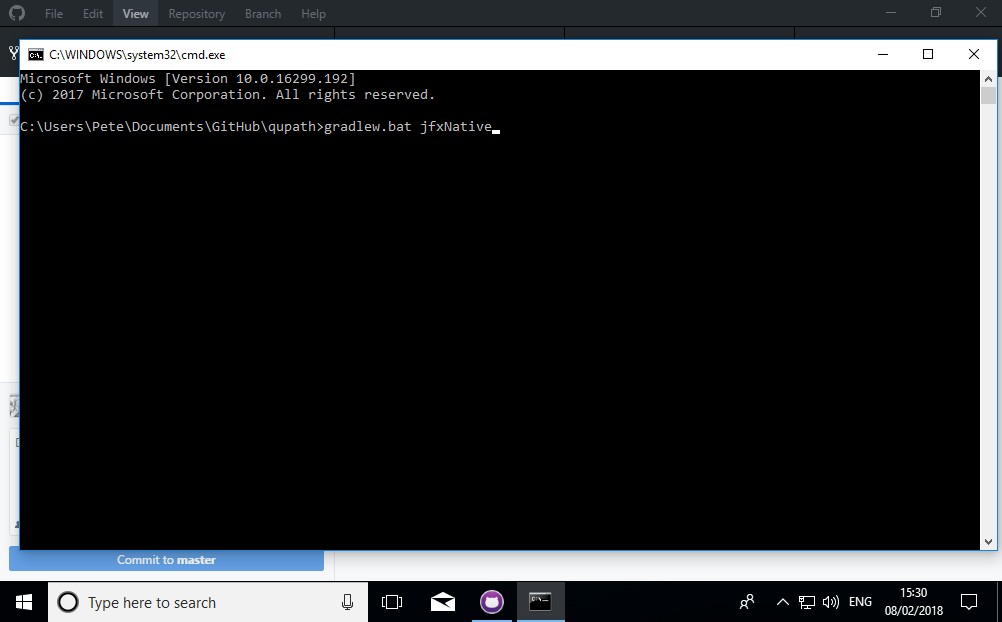
That’s it! It may take a while at first to download all the dependencies etc.
If successful, it will create a new QuPath.exe (or QuPath.app for Mac) under
[wherever the QuPath code was downloaded]/build/jfx/native/QuPath
QuPath building tip!
If you have Git installed, you might prefer to run
gradlew.bat jfxNative -Prequest-git-tag=trueThis will call
git describe --tagsfrom the command line.The result is accessible from Help → System info, making it possible to find the latest commit when QuPath was built. This enables more fine-grained versioning and traceability.
(I’ve tried this only on a Mac so far… feedback on whether it works for other platforms welcome)
Future updates
Whenever you want to get the latest code, you should be able to do it inside the GitHub Desktop application:
- Press the Fetch origin button to check for updates
- If there are updates, the text of the button will change to Pull origin
- Press Pull origin to get the changes
Once any changes have been pulled down, it’s a matter of once more running
gradlew.bat jfxNative
Troubleshooting
The steps above should go very smoothly, and they usually do. But I have also seen things occasionally go wrong for no apparent reason, and not produce a QuPath.
In that case, go back to the command prompt as described above and type
gradlew.bat clean
This can help magically fix things. Then try again.
It’s quite a good idea to run
gradlew.bat cleanfrom time to time anyway… just to clear up any files that might be lingering around but not needed any more.
Future plans: Minor changes, major changes
Maybe one day QuPath can grow to have a team of developers and contributors improving the software. But it’s not there yet.
My current work on the code really splits in two:
- Minor changes, including bug-fixes, aiming to keep full backwards-compatibility
- Major changes, needed to add much more exciting new features & capabilities
Everything described above fits in the first category (a fairly loose definition of ‘minor’). I hope that they are sufficient to keep QuPath going more or less as it was - but better in lots of practical ways.
The ‘major changes’ are kept separate for now, until they are in a more usable state.
I will try to continue answering questions as much as I can, and to solve any really critical issues related to 1. But I’m keen to avoid this swallowing up all my time, and I hope others might consider contributing support and bug fixes where possible.
As a researcher with limited time, my main priority is on 2. I think the new features and ideas planned will be well worth it, and help to make QuPath vastly more useful (and user-friendly) than it currently is for a wide range of people and projects.
I will post a bit more about this as the changes continue to take shape.
In the meantime, I hope the improvements introduced here are already helpful.
Please do leave a comment (or communicate some other way) if you find them useful, discover a bug, have an idea, or generally want to contribute to QuPath in the future.
And if you want to keep up to date with further developments, you can follow me on Twitter or GitHub at the links below - or just check out this blog from time to time.