QuPath v0.2.0-m5 available
Fifth milestone on the path to QuPath v0.2.0
QuPath v0.2.0-m5 is now online!
This milestone contains even more changes than m4. The main ones are summarized below.
If you are using an earlier milestone, it is strongly recommended to update (after backing up your work, of course).
Many bugs and issues have been fixed. If you find new ones, please report them on GitHub or image.sc - don’t just stick with an older version that seemed to work!
For all other questions or discussions (not bugs), please use image.sc only.
More functional pixel classifier!
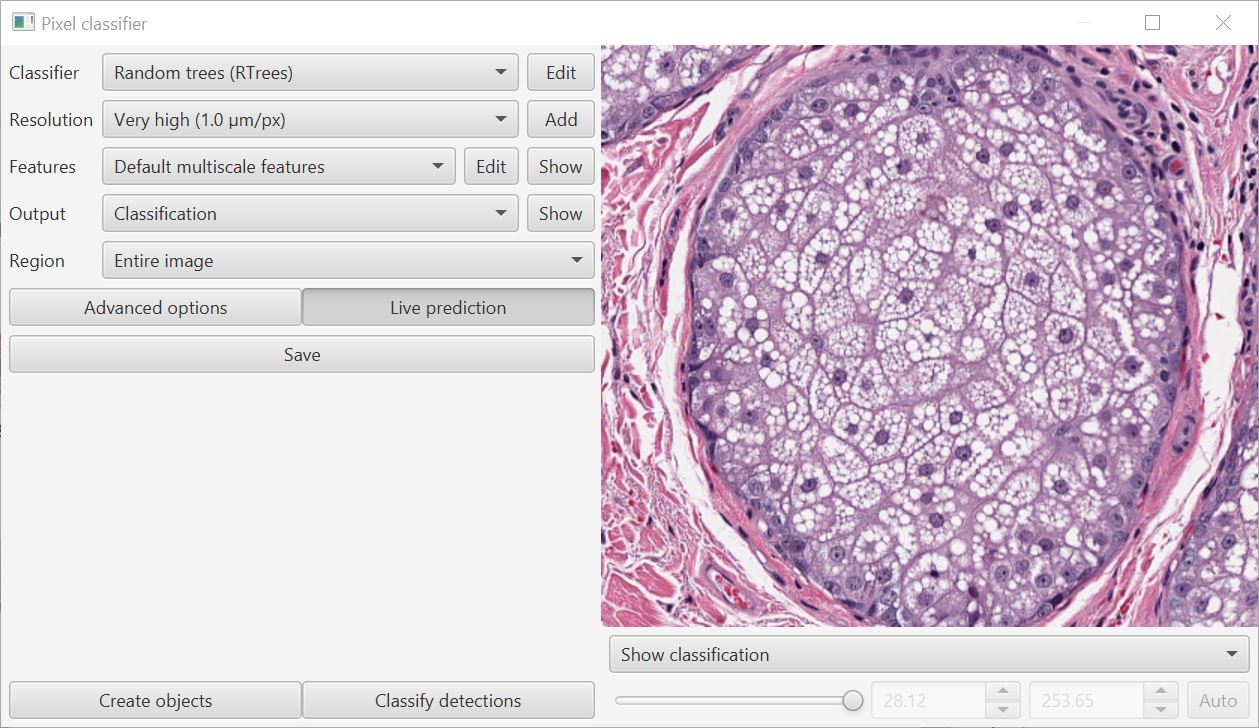
The biggest visible change is that the pixel classifier has taken a large step towards being useful.
Currently, it can be applied to do three main things:
- Measure areas (including relative proportions of different classified regions)
- Create objects (both annotations & detections)
- Classify detections (based on the pixel classification at the detection centroid)
With a little bit of scripting, you can also export the classification as an indexed image or probability map to use elsewhere.
![]()
Apply classifiers to different images
When you start building a pixel classifier, you can now switch to different images to immediately see the result of applying the classifier there.
When using a project, you can also save your classifier and then use Classify → Pixel classification → Load pixel classifier to get it back on a new image. The classifier itself is stored within the project directory.
Create a training image
Note that you can’t continue training the same classifier while skipping between images: a new classifier is always trained from the annotations on the current image only.
However, there is a way to work around this:
- Put all the images that should be used to train the classifier in a single project
- Open each image and create annotations for one or more representative (or challenging) regions, and assign the annotations all the same classification.
- Run Classify → Create project training image
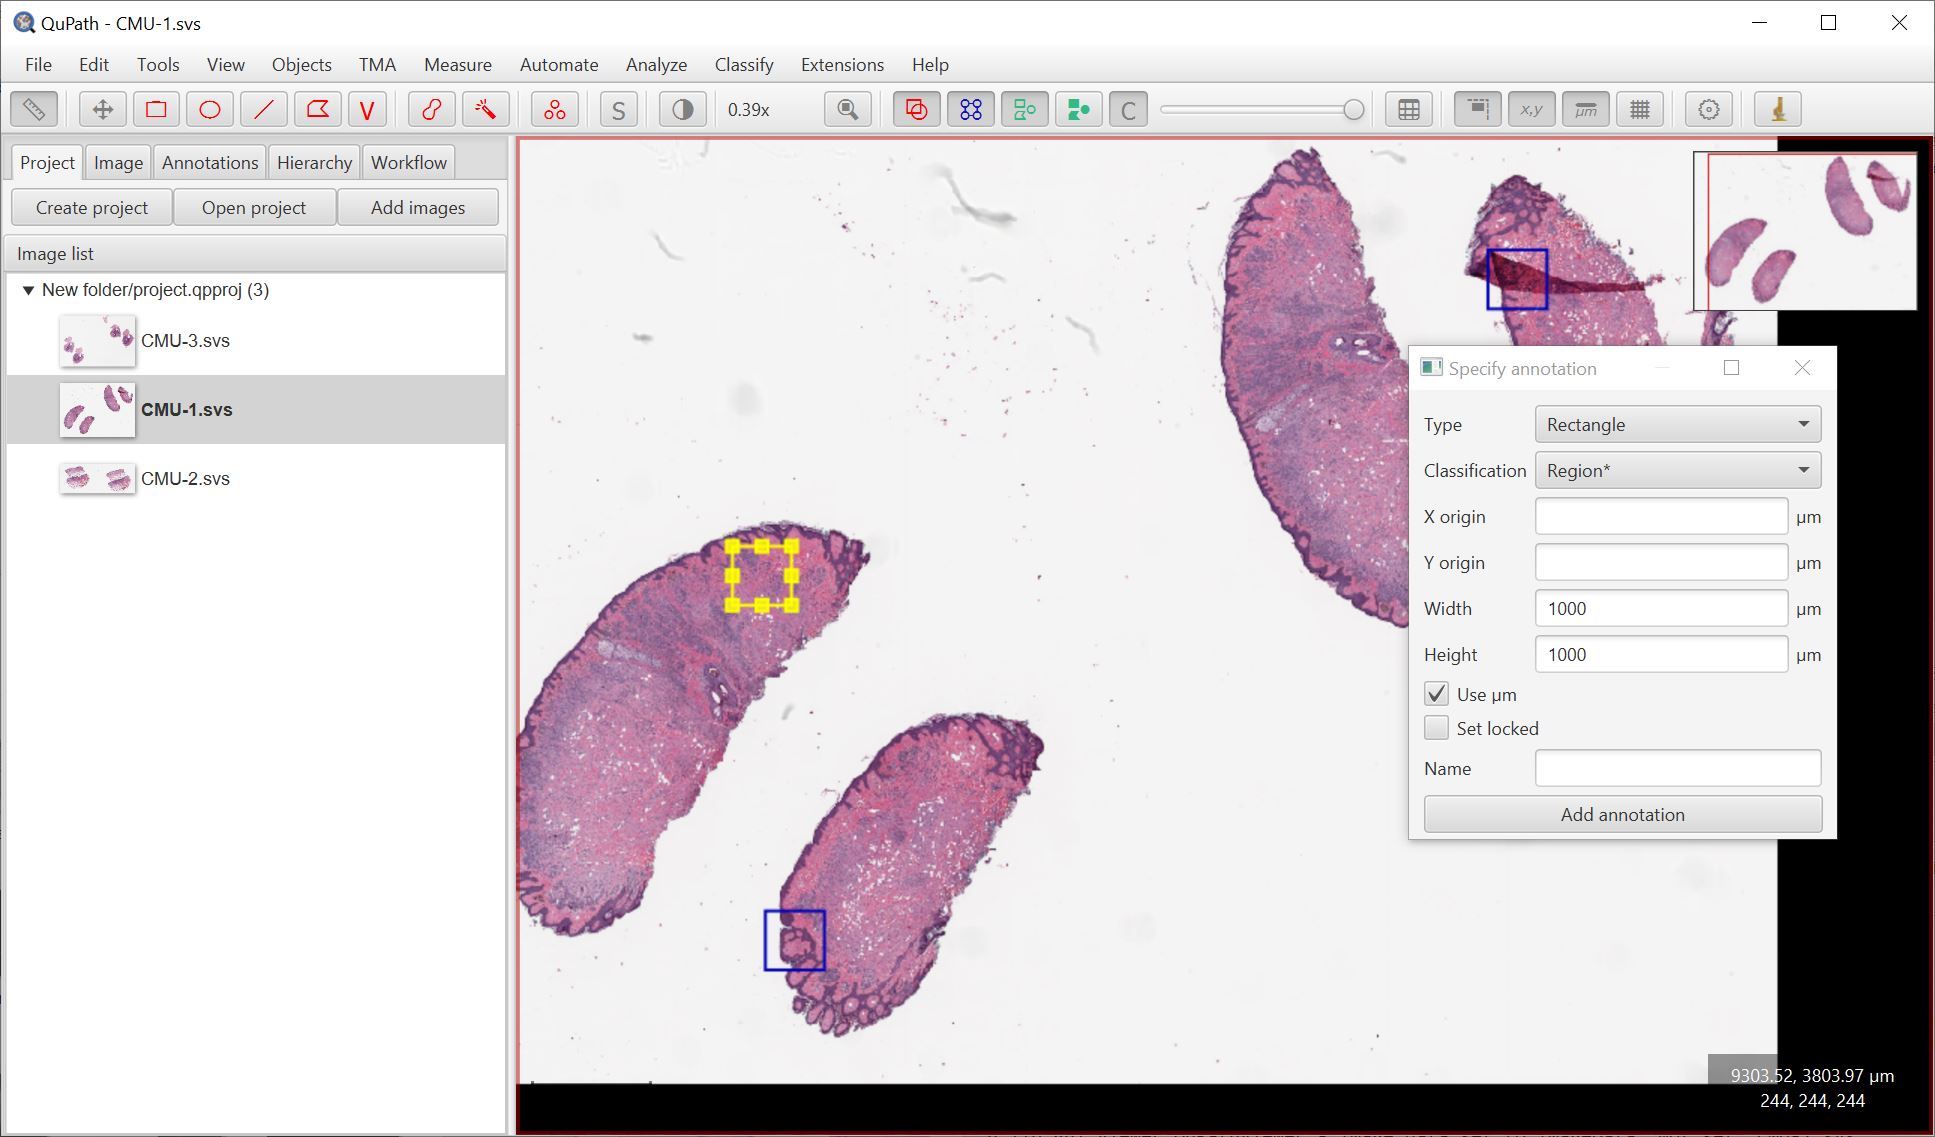
For Step 2. I suggest using Objects → Annotations… → Specify annotation, and choosing the classification Region*.
The end result should be a single image composed of the regions you selected, which can then be used to train a classifier - immediately seeing how it performs across a (parts of) multiple images.
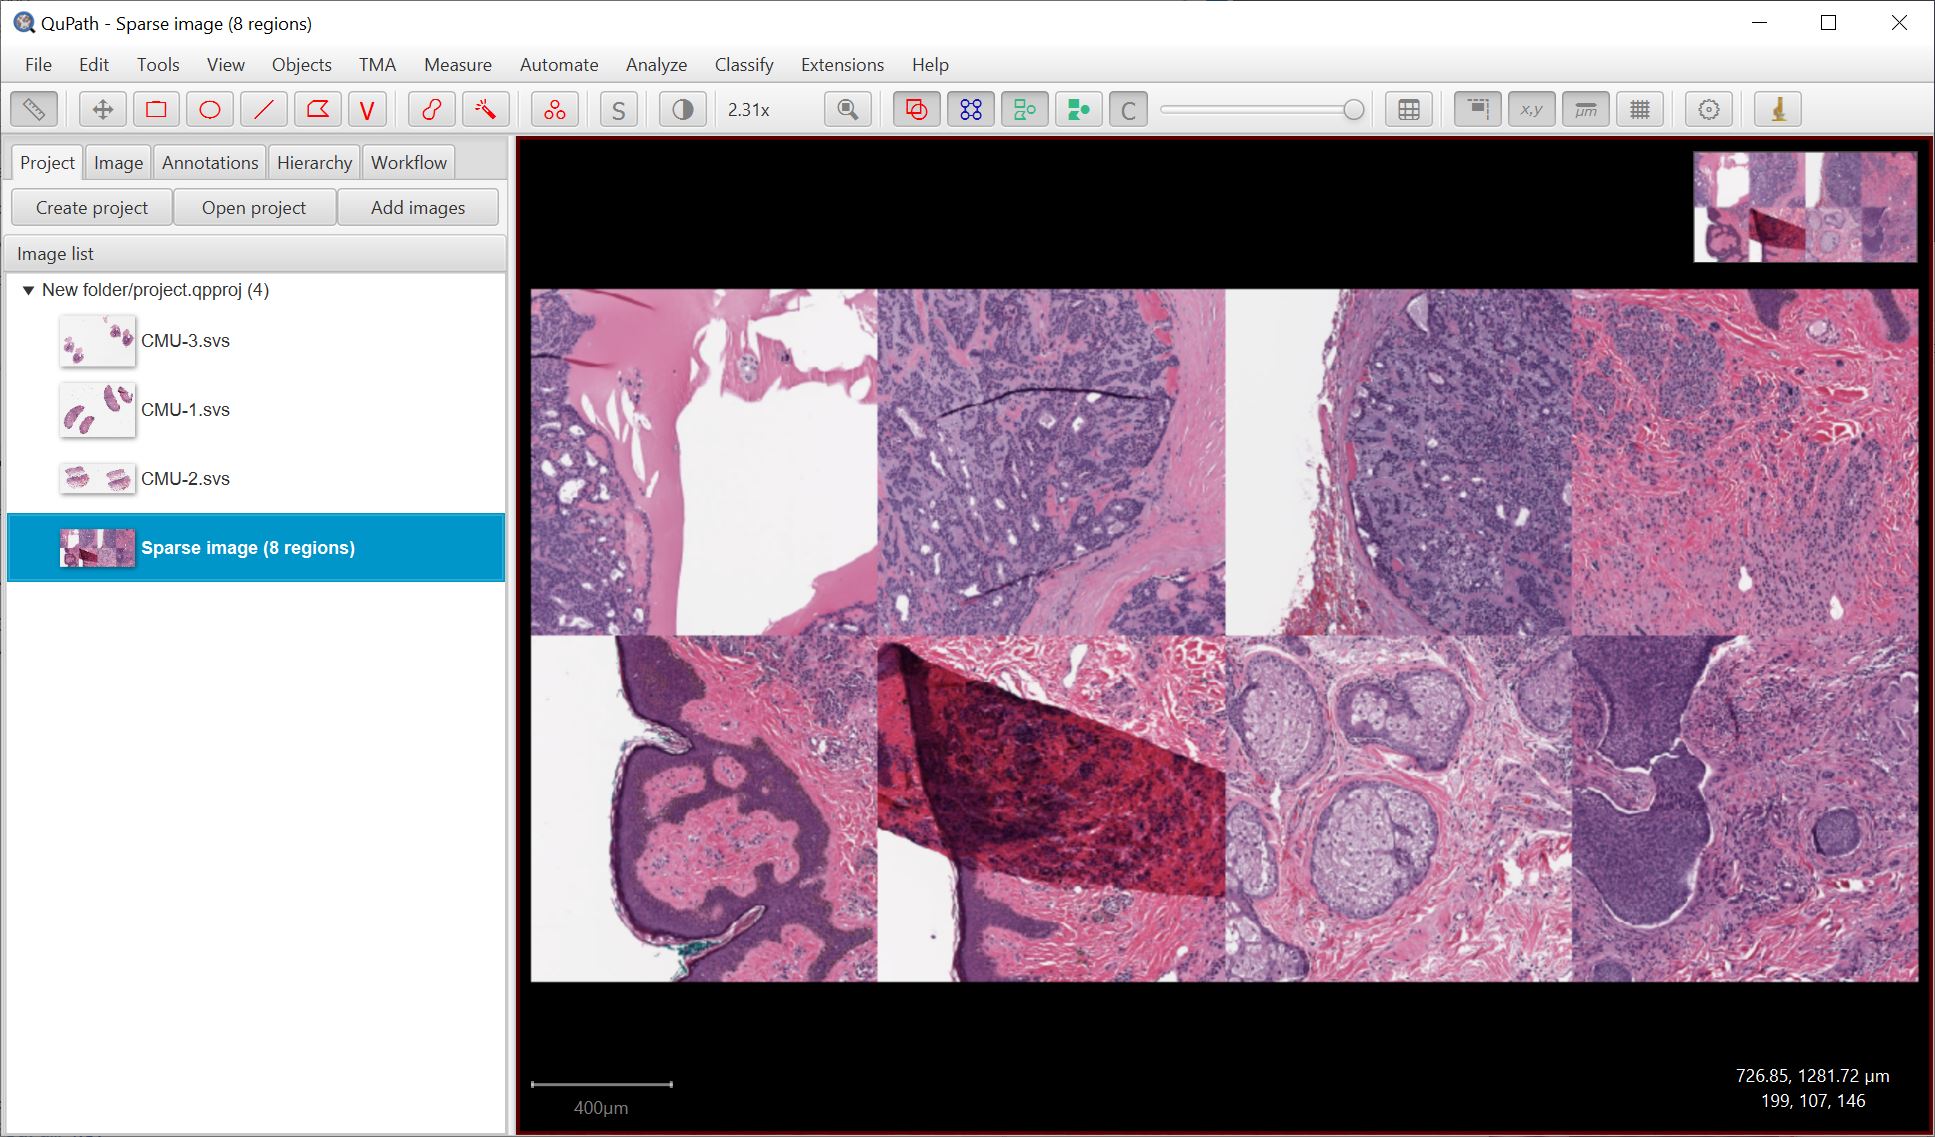
Create project training image works by extracting regions dynamically from the original image files - it doesn’t need to write a new image file. Usually this should be ok, but if you have memory troubles you may want to write the image as an OME-TIFF for better performance.
New features & feature overlays
The performance of the pixel classifier depends a lot on the features used for training. First, you’ll need to select these with the Edit button.
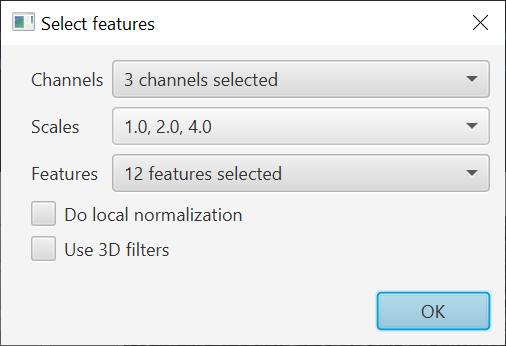
The features are basically filtered copies of the image. The classification result is determined from the values of pixels in the feature images - so ideally these features should accent the kind of thing the classifier should detect.
When training a classifier, you can now visualize the features in context using the drop-down menu on the bottom right of the training window.
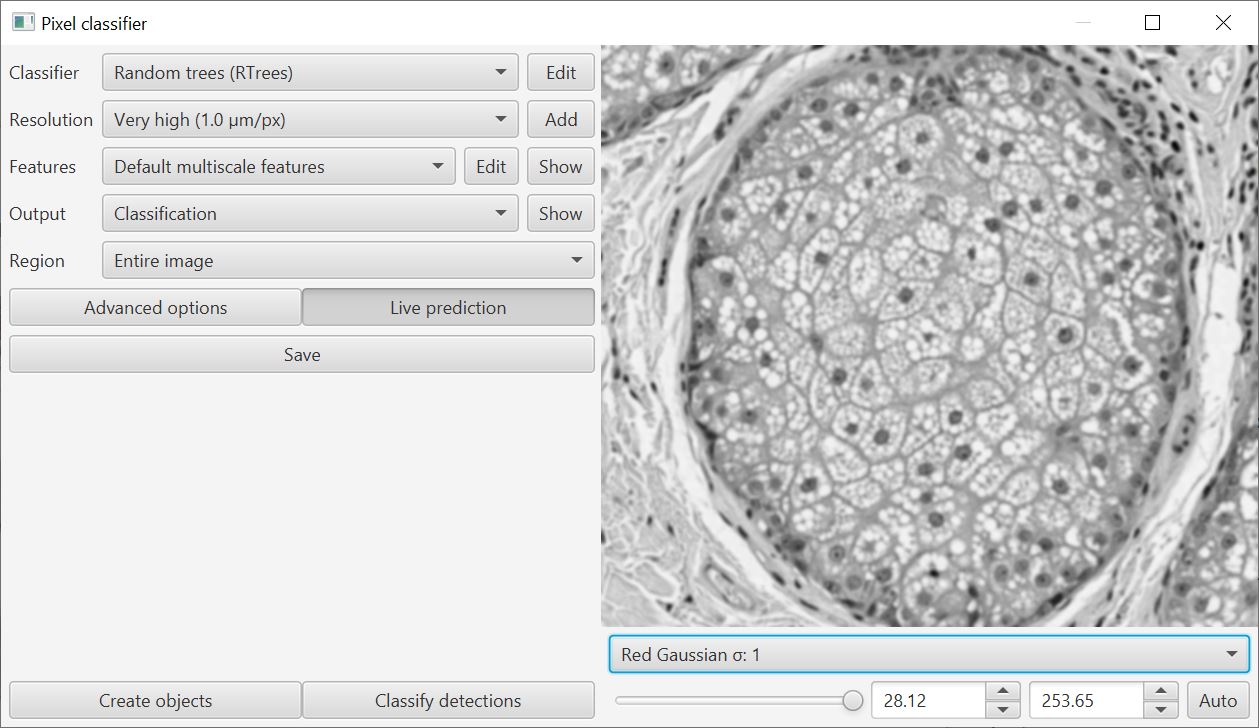

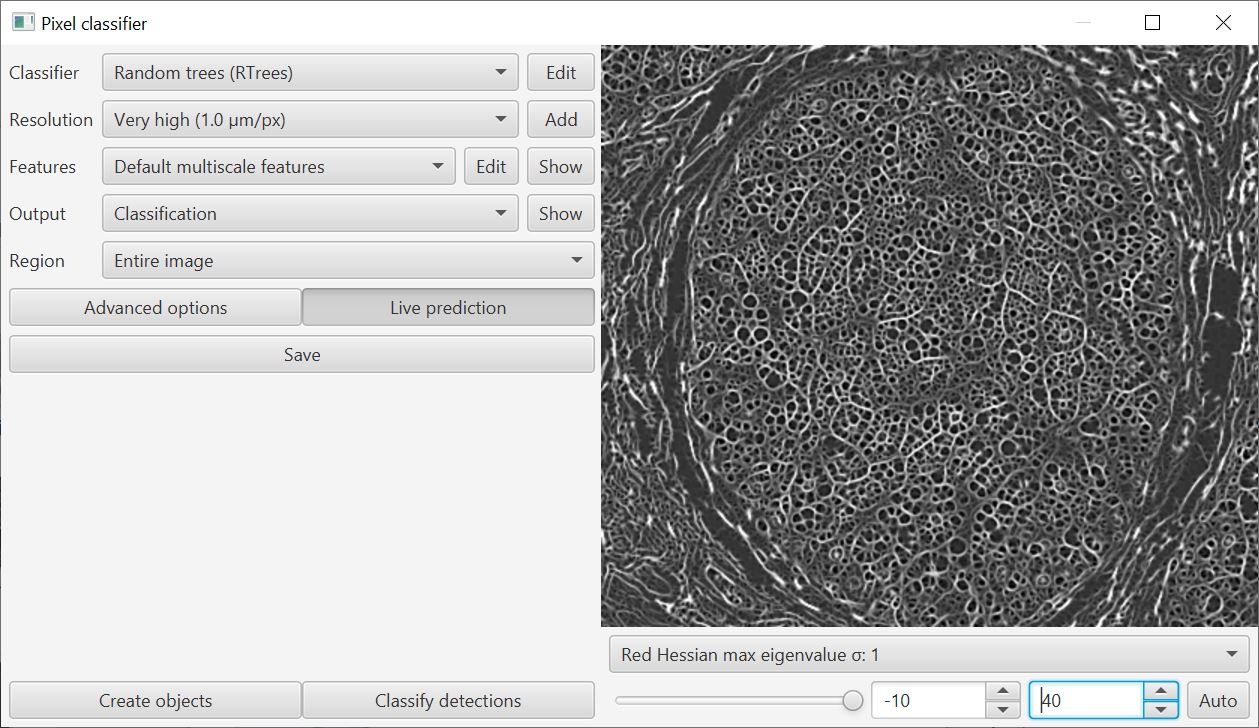
This helps with the decision about which features are meaningful: use too many and the classifier can perform worse rather than better.
The following table gives an informal summary of where each feature might come in useful:
| Feature | Purpose |
|---|---|
| Gaussian filter | General-purpose (color & intensity) |
| Laplacian of Gaussian | Blob-like things, some edges |
| Weighted deviation | Textured vs. smooth areas |
| Gradient magnitude | Edges |
| Structure tensor eigenvalues | Long, stringy things |
| Structure tensor coherence | ‘Oriented’ regions |
| Hessian determinant | Blob-like things (more specific than Laplacian) |
| Hessian eigenvalues | Long, stringy things |
But now that you can visualize them, probably best do that and draw your own conclusions.
Generally, I stick with Gaussian and add others if necessary. I usually avoid structure tensor features as a) I haven’t found them terribly useful, and b) they take more time and memory to compute.
Advanced options
There are some additional advanced options available for the pixel classifier.
![]()
Perhaps the most interesting is the ability to set a boundary strategy. In short, this means that any area annotation (e.g. rectangle, polygon) with a (non-ignored) classification, QuPath can treat the boundary of the annotation as if it had a different classification from the rest of the shape.
The purpose of these methods are to make it possible to train a classifier that tries to learn the separation between dense structures.
Furthermore, when choosing a boundary strategy you also need to specify the line thickness - which also influences the thickness of other line annotations, regardless of boundary strategy.
A class whose name ends with an asterisk (e.g. Region* or Ignore*) is ignored in some circumstances, e.g. when calculating areas after pixel classification or when generating objects.
A multichannel fluorescence image (thanks to La Jolla Institute for Immunology)…
![]()
…with a pixel classifier using a boundary class with thin boundaries…
![]()
…or thicker boundaries.
![]()
Limitations & plans
There is a lot more to be done with the pixel classifier, including:
- Make it (more easily) scriptable
- Finalize the format for saving/loading classifiers (this might change!)
- Create a way to make measurements ‘stick’ in annotations
- Improve the local normalization option (you can try it already, but I don’t recommend it…)
- Add extra options for what to do with the output (e.g. classify cells based on partial overlap, subcellular detection)
- Add support for color transforms (not just image channels)
- Make it possible to be more selective about which features are calculated for which channels
- Show progress bars for things that take a long time
- Document how all this relates to deep learning…
Simple thresholding
Not everything requires a fully-trained pixel classifier. Sometimes a simple threshold will do.
Classify → Pixel classification → Create simple thresholder is intended for such times.
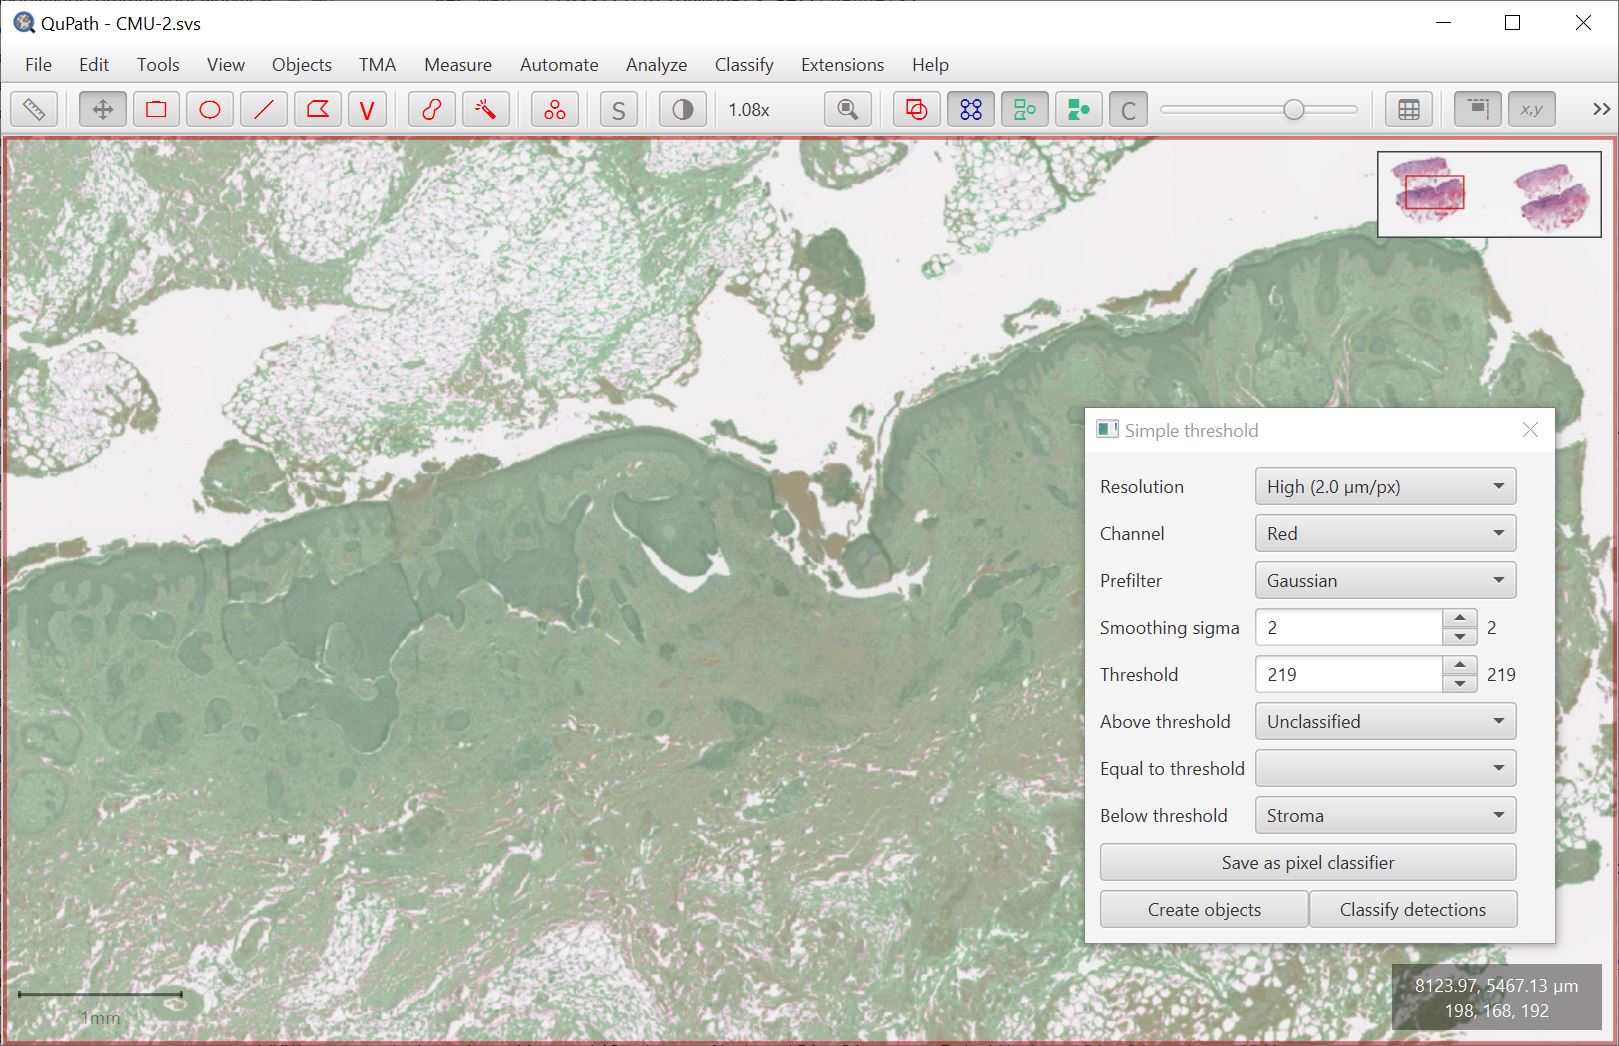
This command should ultimately replace Simple tissue detection. The concept is similar but the classifier approach provides much more control and interactive feedback.
QuPath’s pixel classification framework is intended to be flexible (which is where deep learning will fit in soon). Setting a threshold is really creating a classifier… just a very simple one.
Wand trickery
The Wand tool has a new trick that is useful with the pixel classifier (including simple thresholding).
If you press the Ctrl key then all smoothing will be disabled, and the wand will expand for pixels with exactly the same color. This is helpful if you have an opaque overlay on top of the image, since the wand will then more closely expand to the edge of any region.
Separately, there is an additional wand option in the preferences to choose slightly different behavior by being applied to images with different color transforms.

Scripting improvements
As QuPath’s internals move around with each new milestone, scripts break. It shouldn’t always be this way, but for now maintaining backwards compatibility would just require too much time and be too restrictive when it comes to improving the software overall.
A few changes have been made to help mitigate the trouble I cause.
Automatic imports
Previously, QuPath would import one special class: QPEx.
This contains all the common scripting methods like getAnnotationObjects() and runPlugin().
But going beyond this requires using parts of QuPath strewn across hundreds more source code files. These need to be imported before they can be used.
To help with this, the script editor can now import a list of useful classes. The following example prints them out:
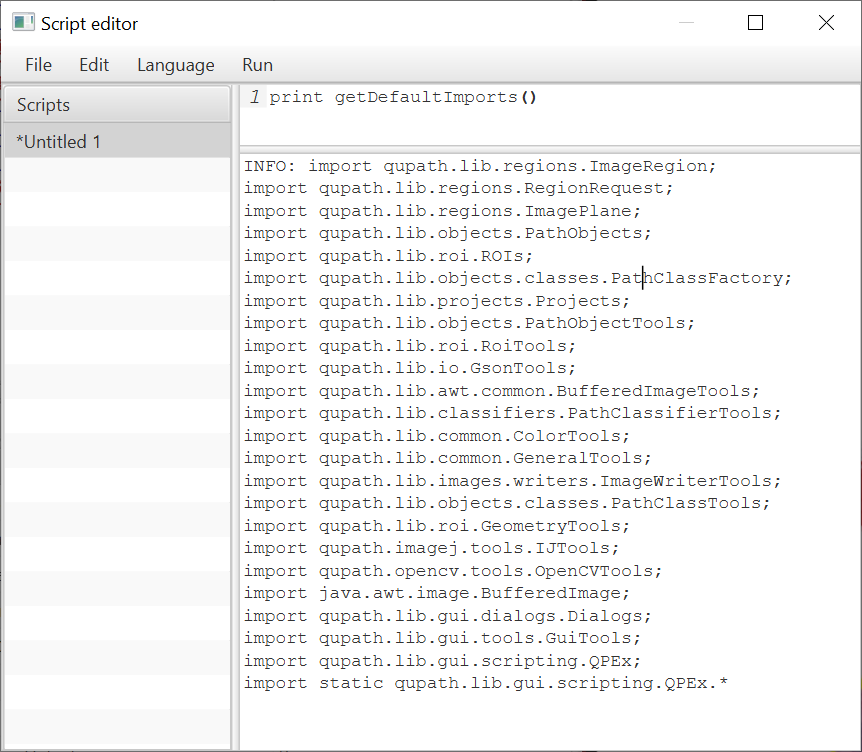
This means that you can use any methods that you like from these classes without a need to import.
The line
static qupath.lib.gui.scripting.QPEx*means that the available methods are imported directly - that’s why you can typegetSelectedObject()rather thanQPEx.getSelectedObject().This doesn’t happen for all classes because it would be hard to separate a mess of hundreds of methods: using the class name (e.g.
ROIs,PathObjects) is useful to group them by theme.
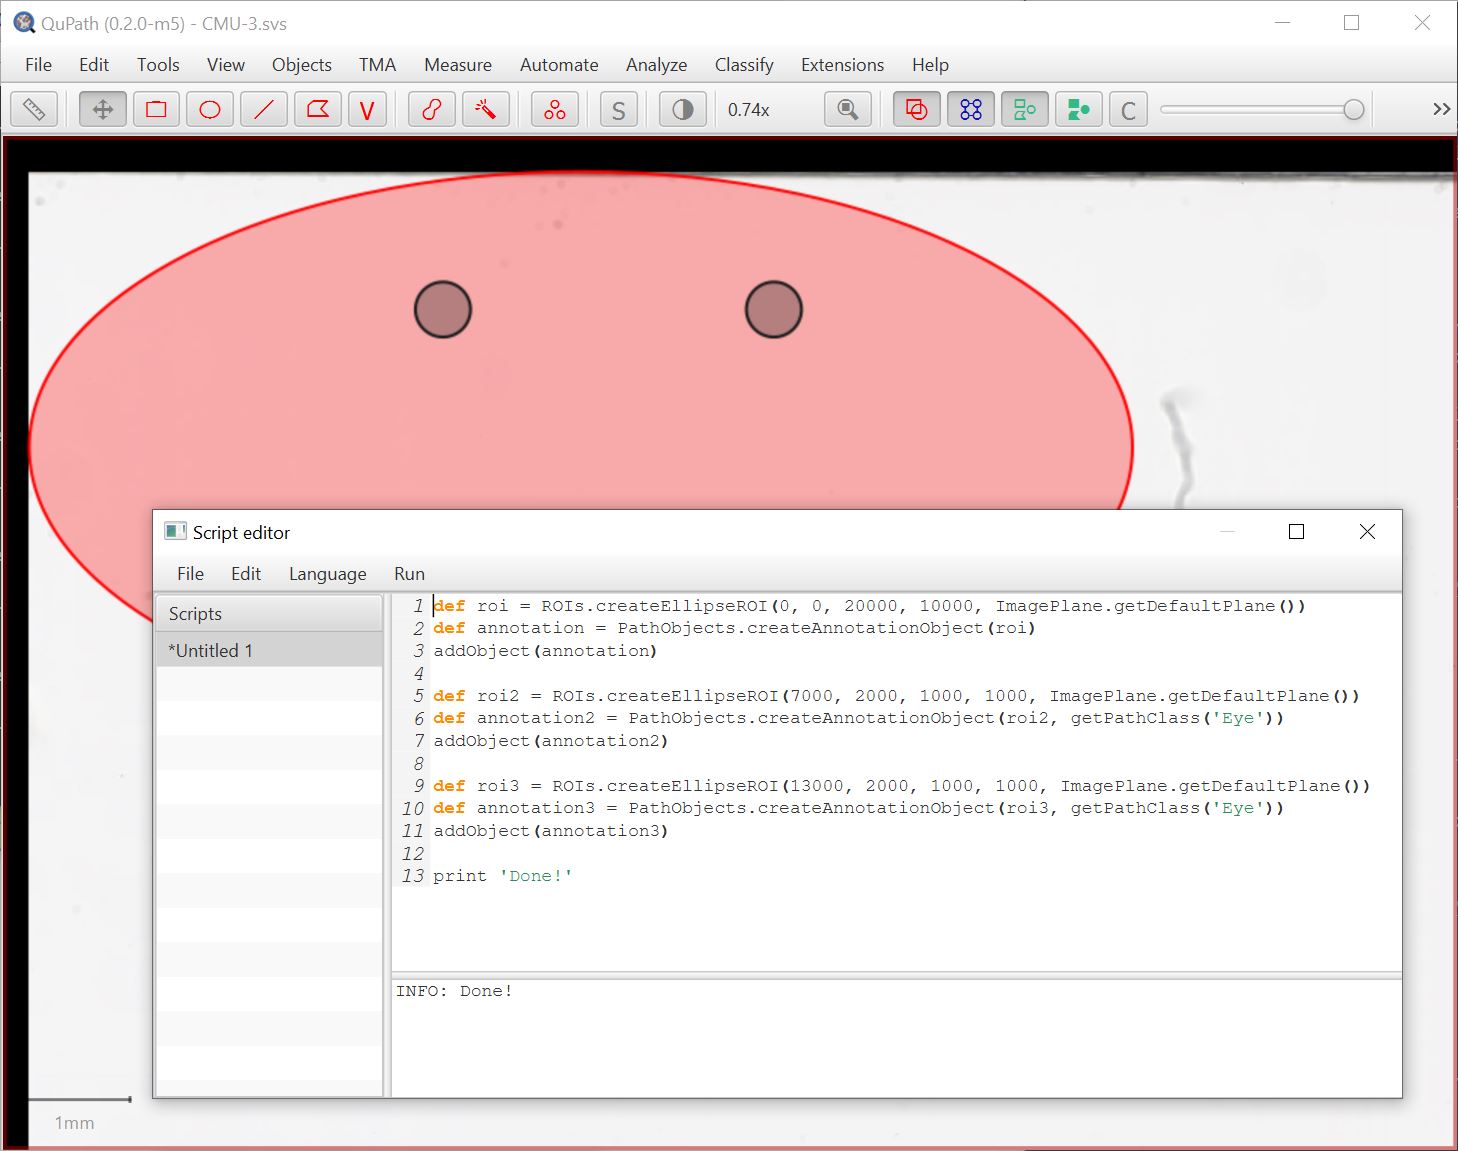
Here’s an example to programmatically create annotations:
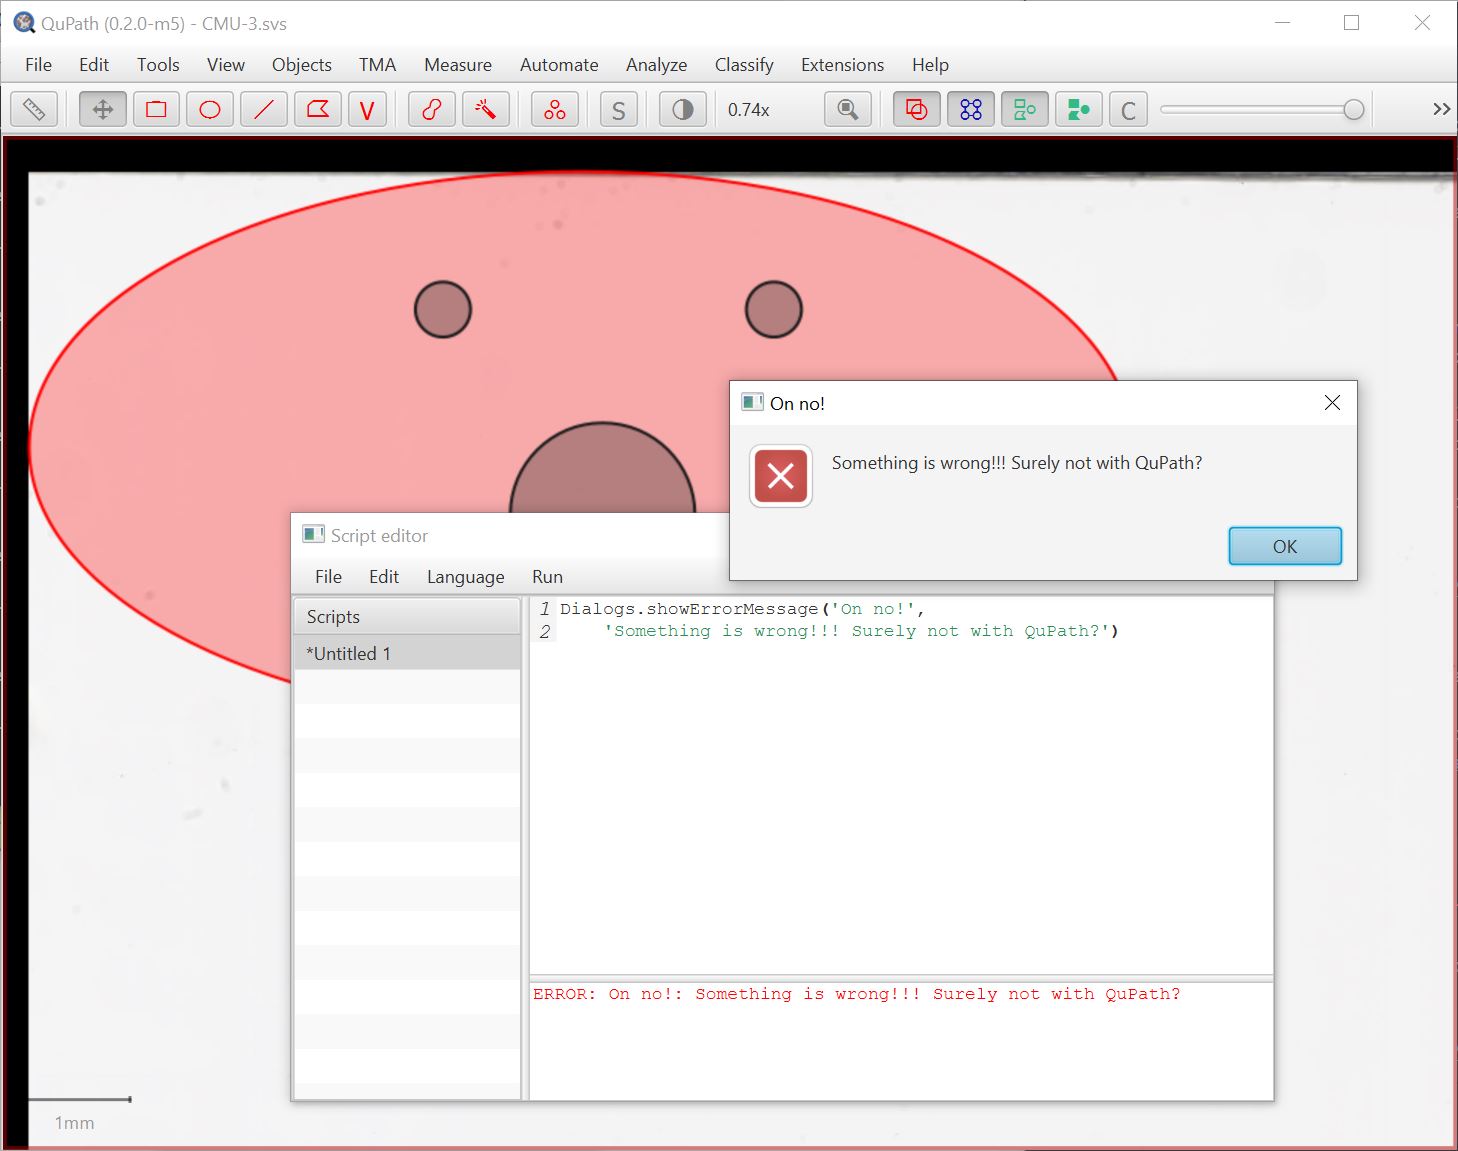
And here’s one showing an error message:
Previously, you’d have to explicitly import the class before being able to do this (and curse me if I’ve moved the class since you last needed it).
Now, you can leave it up to the default import statements instead, provided that Run → Include default imports is selected.
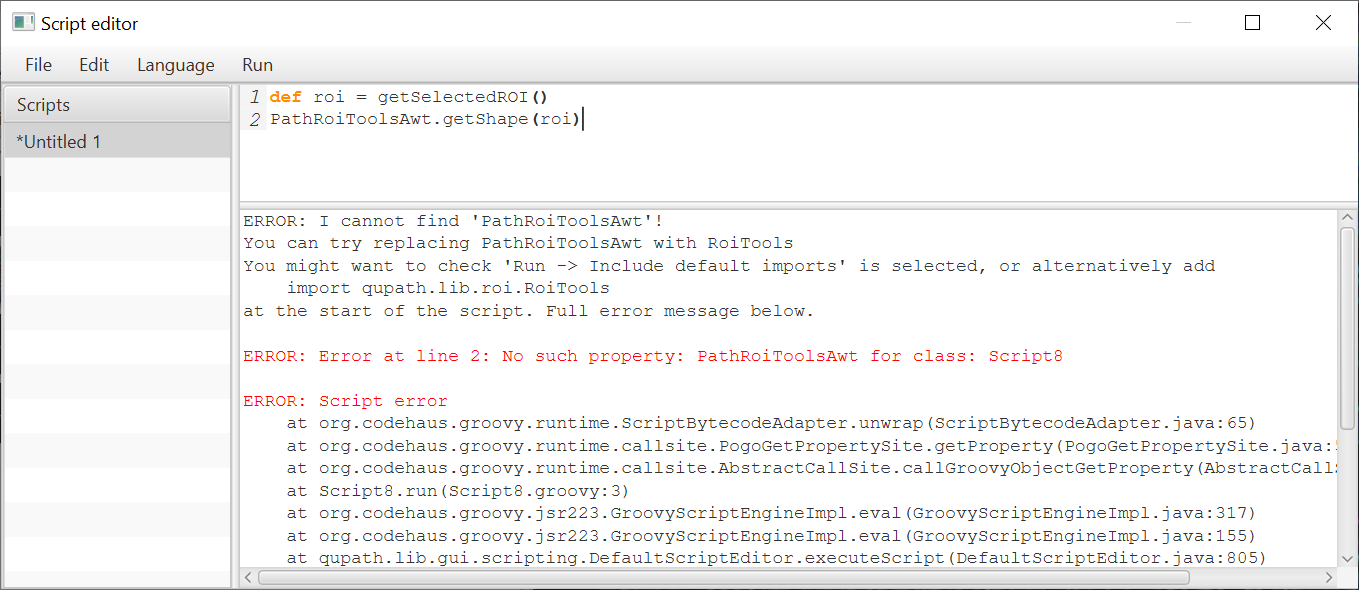
(Some) more informative errors
To ease the transition further, I have added some more informative error messages for common (Pete-induced) problems.
Finding methods
The default imports are a start, but you still need to know what the classes are and what they can do.
One important trick is Ctrl + space.
Press this in the script editor and it will try a (very rudimentary) auto-complete.
Press space repeatedly to cycle through the options.
Another is the new describe method, used as shown here:
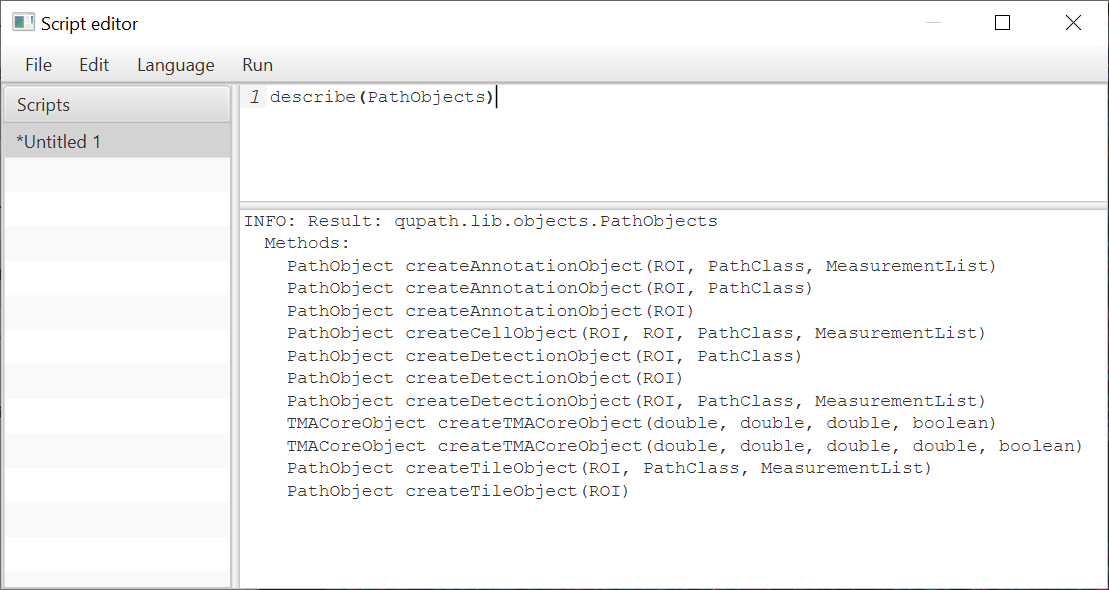
It is, admittedly, a poor substitute for a full software development environment. But there’s always IntelliJ for serious scripting.
New methods
Several new built-in methods have also been added to QPEx make life easier:
// Set the pixel width & height to 0.5 microns
setPixelSizeMicrons(0.5, 0.5)

// Set the names of channels (in order)
// Since v0.2.0-m4 channel names are more important for commands
// such as cell detection
setChannelNames('First', 'Second', 'Third')

// Replace the classifications for all objects
replaceClassification('Tumor', 'Stroma')

// Export summary measurements for the entire image
def path = buildFilePath(PROJECT_BASE_DIR, 'export.txt')
saveImageMeasurements(path)
Syntax highlighting
A final change in the script editor is in the colors used for syntax highlighting: methods no longer turn orange (although keywords do), and some other colors are different.
The reason for this is…
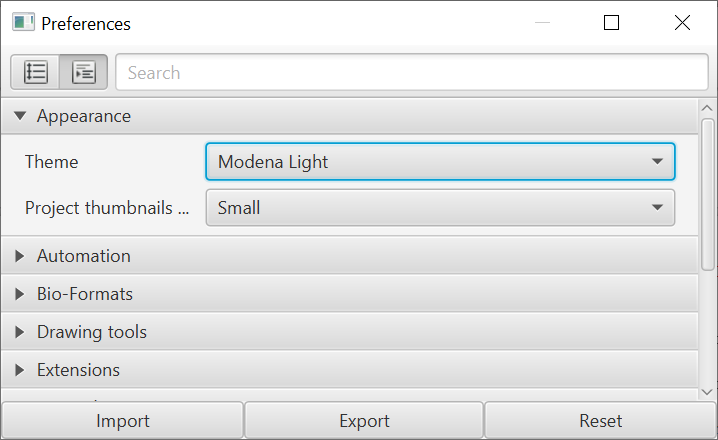
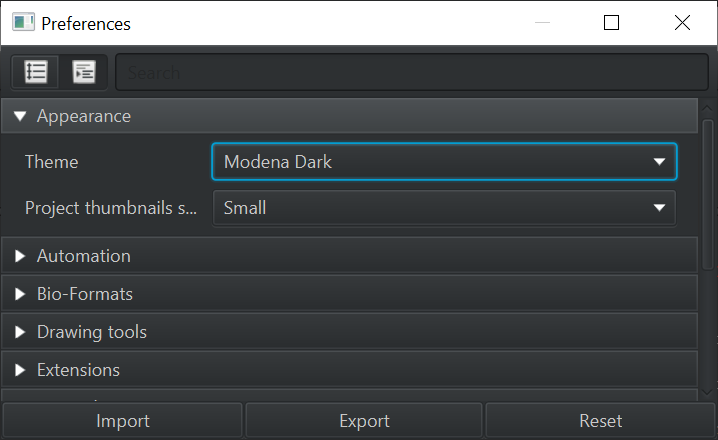
Dark mode
As the eagle-eyed will have spotted, some of the screenshots have been rather darker than before.
QuPath has always had a kind of ‘Dark mode’, but it wasn’t terribly consistent; the script editor, for example, remained a glaring white, and now and again black-on-almost-black text wasn’t very legible.
v0.2.0-m5 now has a dark mode that should be better behaved.
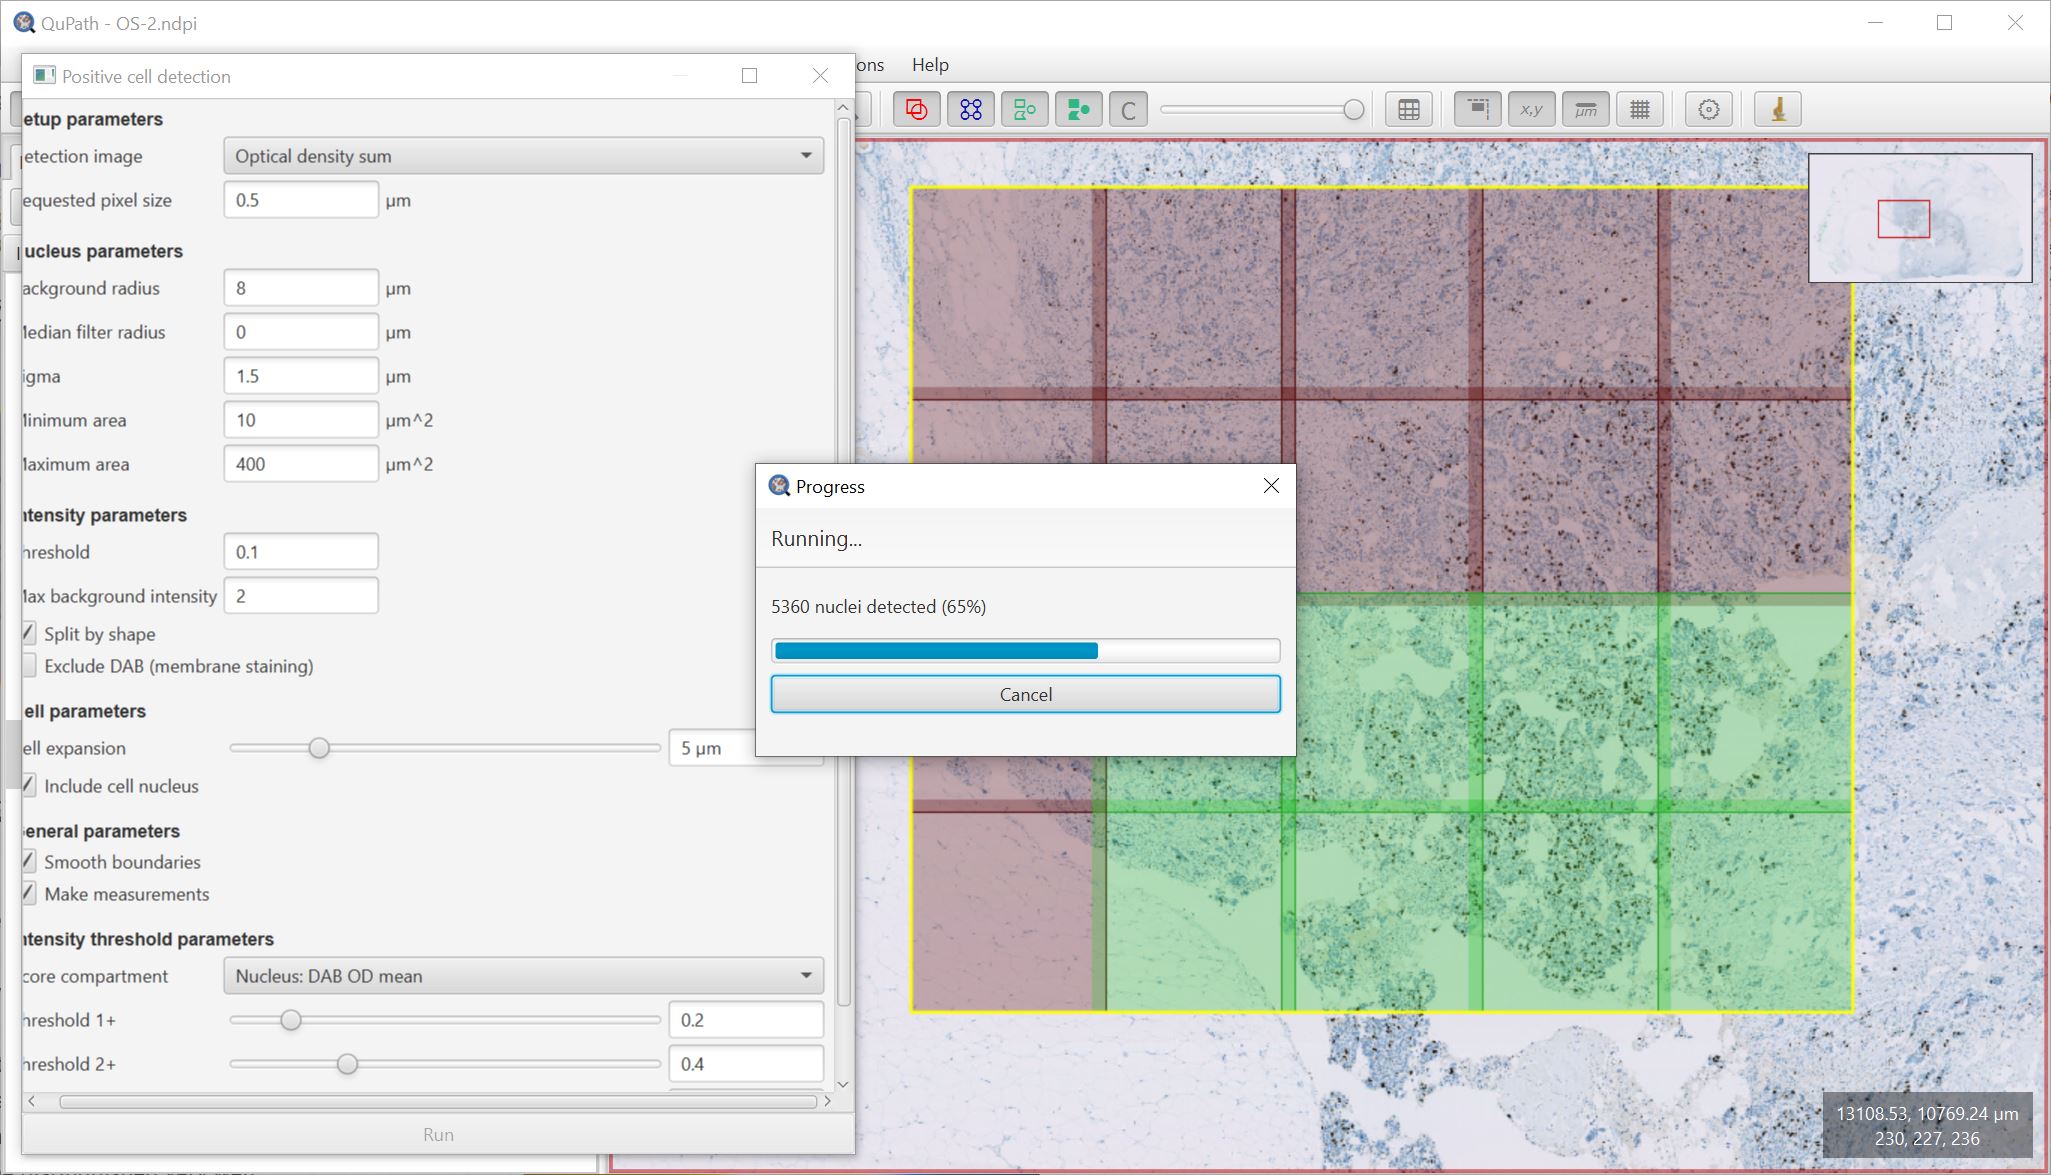
A ‘Cancel’ button that cancels
Continuing the theme of ‘things that were in QuPath but didn’t really work’, when running commands (e.g. cell detection) over a large area there was always a large ‘Cancel’ button.
This was more aspirational than functional: it made a request that the command should stop running, but in practice the command would almost invariably ignore this and continue on its merry way to completion… however long it took.
Now, cancel actually can cancel.
And, even better, QuPath will attempt to restore the state to how it was before the command was started - rather than just aborting the mission awkwardly and leaving a lot of lingering tiles around.
As part of making this work, progress when running a command is displayed differently - with colors used to indicate tiles that are pending, processing or complete.
Better cell detection in large regions
Alongside the improved ‘Cancel’ button, work has been done to improve the consistency of how QuPath resolves overlaps whenever a large region is split into smaller tiled regions for parallel processing.
This is most evident with Cell detection (including Positive cell detection), where the size of the overlaps has also been increased.
Note that this does make some difference to the cells that are detected. Absolute counts when running cell detection in v0.2.0-m5 and earlier versions are likely to differ.
However, it addresses an issue whereby running cell detection with the same parameters on the same (large) region could sometimes give slightly different results because of differences in how the tile overlaps were resolved. Now, the results should be the same each time.
Major ROI revisions
ROIs have undergone major changes… with much effort expended in making it look like they have not changed at all.
The primary difference is that QuPath makes much more use of Java Topology Suite (JTS).
You can convert any QuPath ROI into a JTS Geometry simply by calling ROI.getGeometry(), opening up a world of topological possibilities.
One of the visible outcomes of this is that some commands can now be much faster, such as converting pixel classifications to objects and splitting objects/filling holes. The Objects → Annotations… → Remove fragments command (previously called Refine annotations) gives one way to do this.
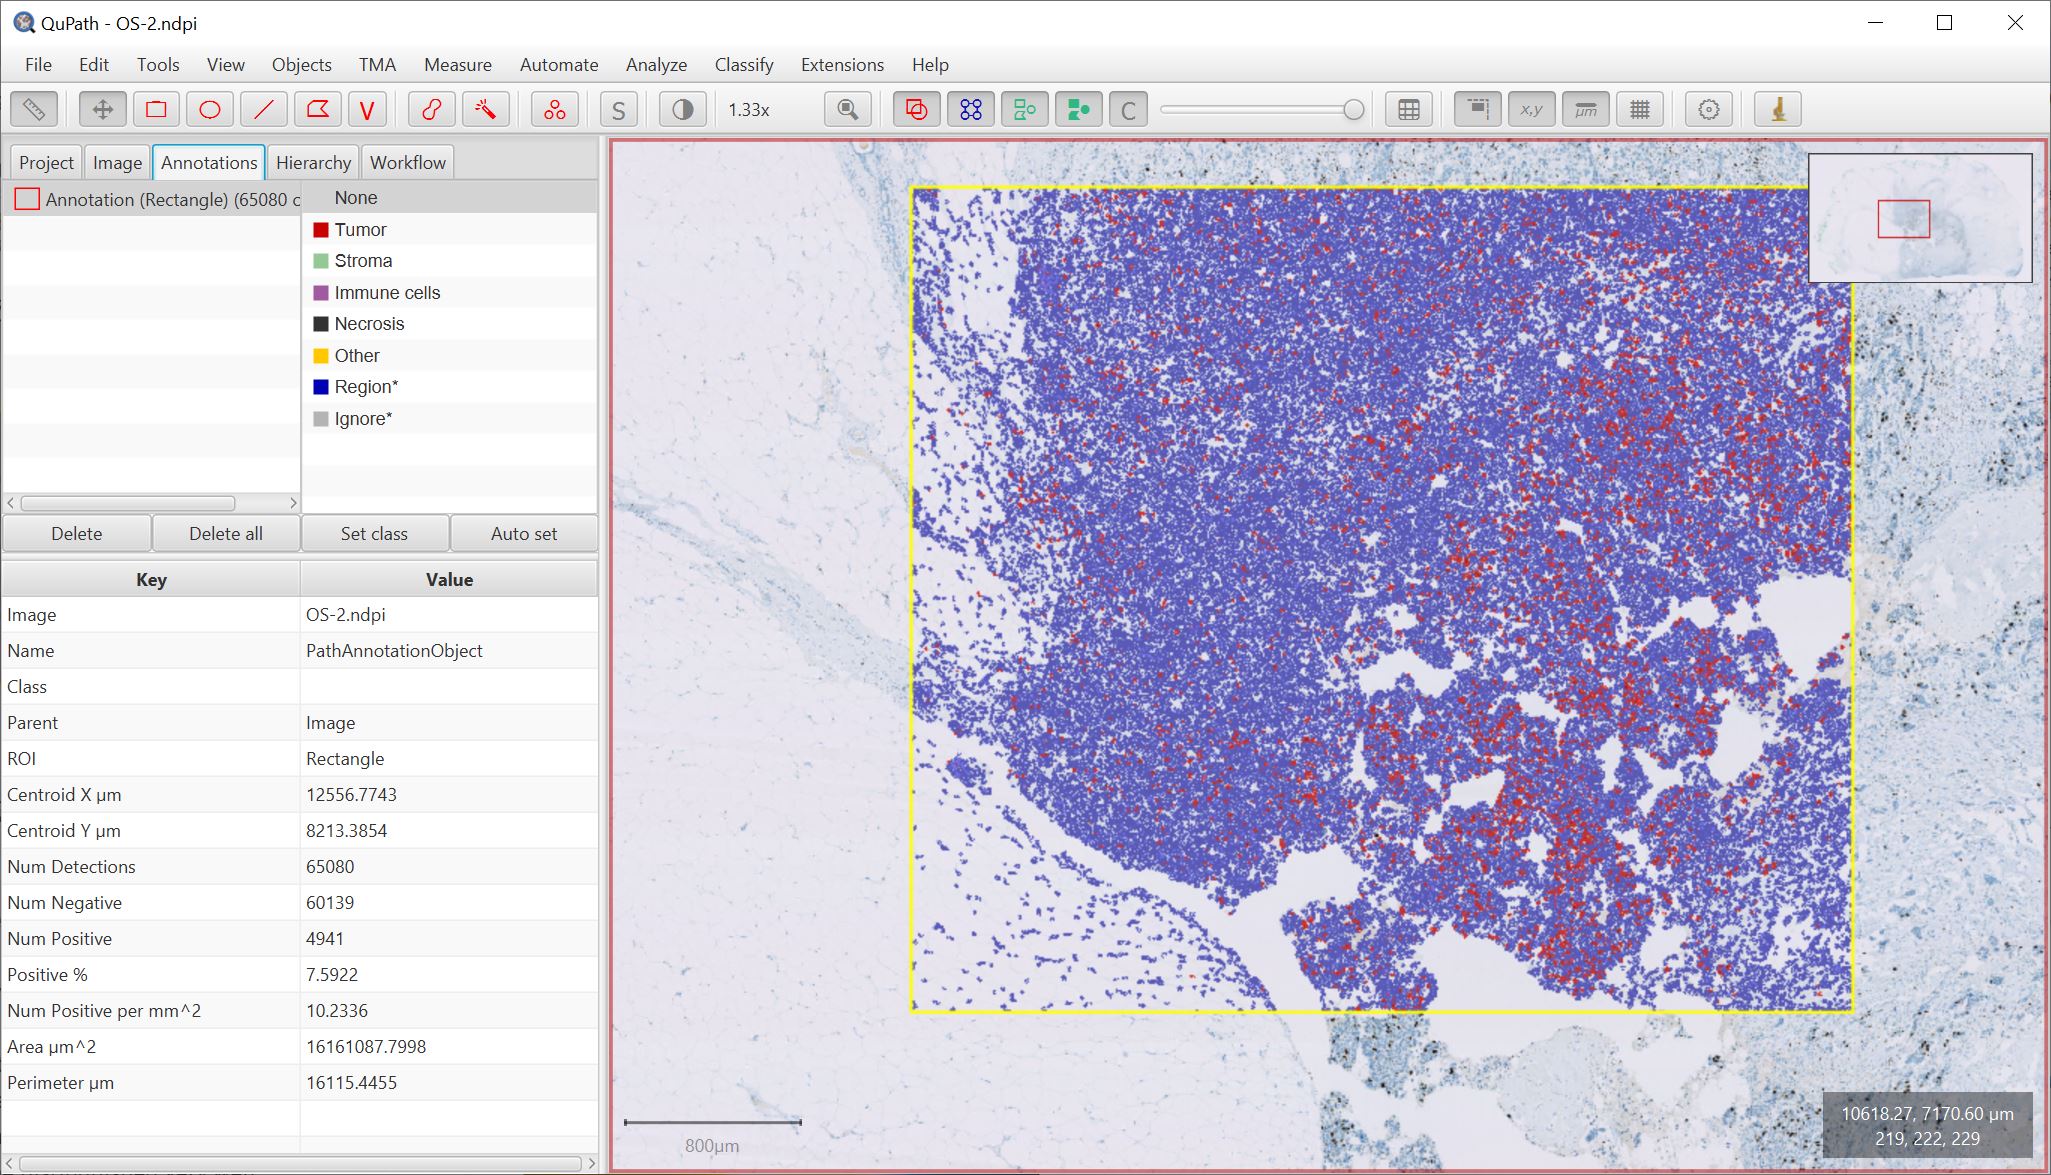
JTS is also used in the (renamed) Analyze → Calculate features → Distance to annotations 2D command, shown below with the new Svidro2 colormap (added due to popular1 demand).
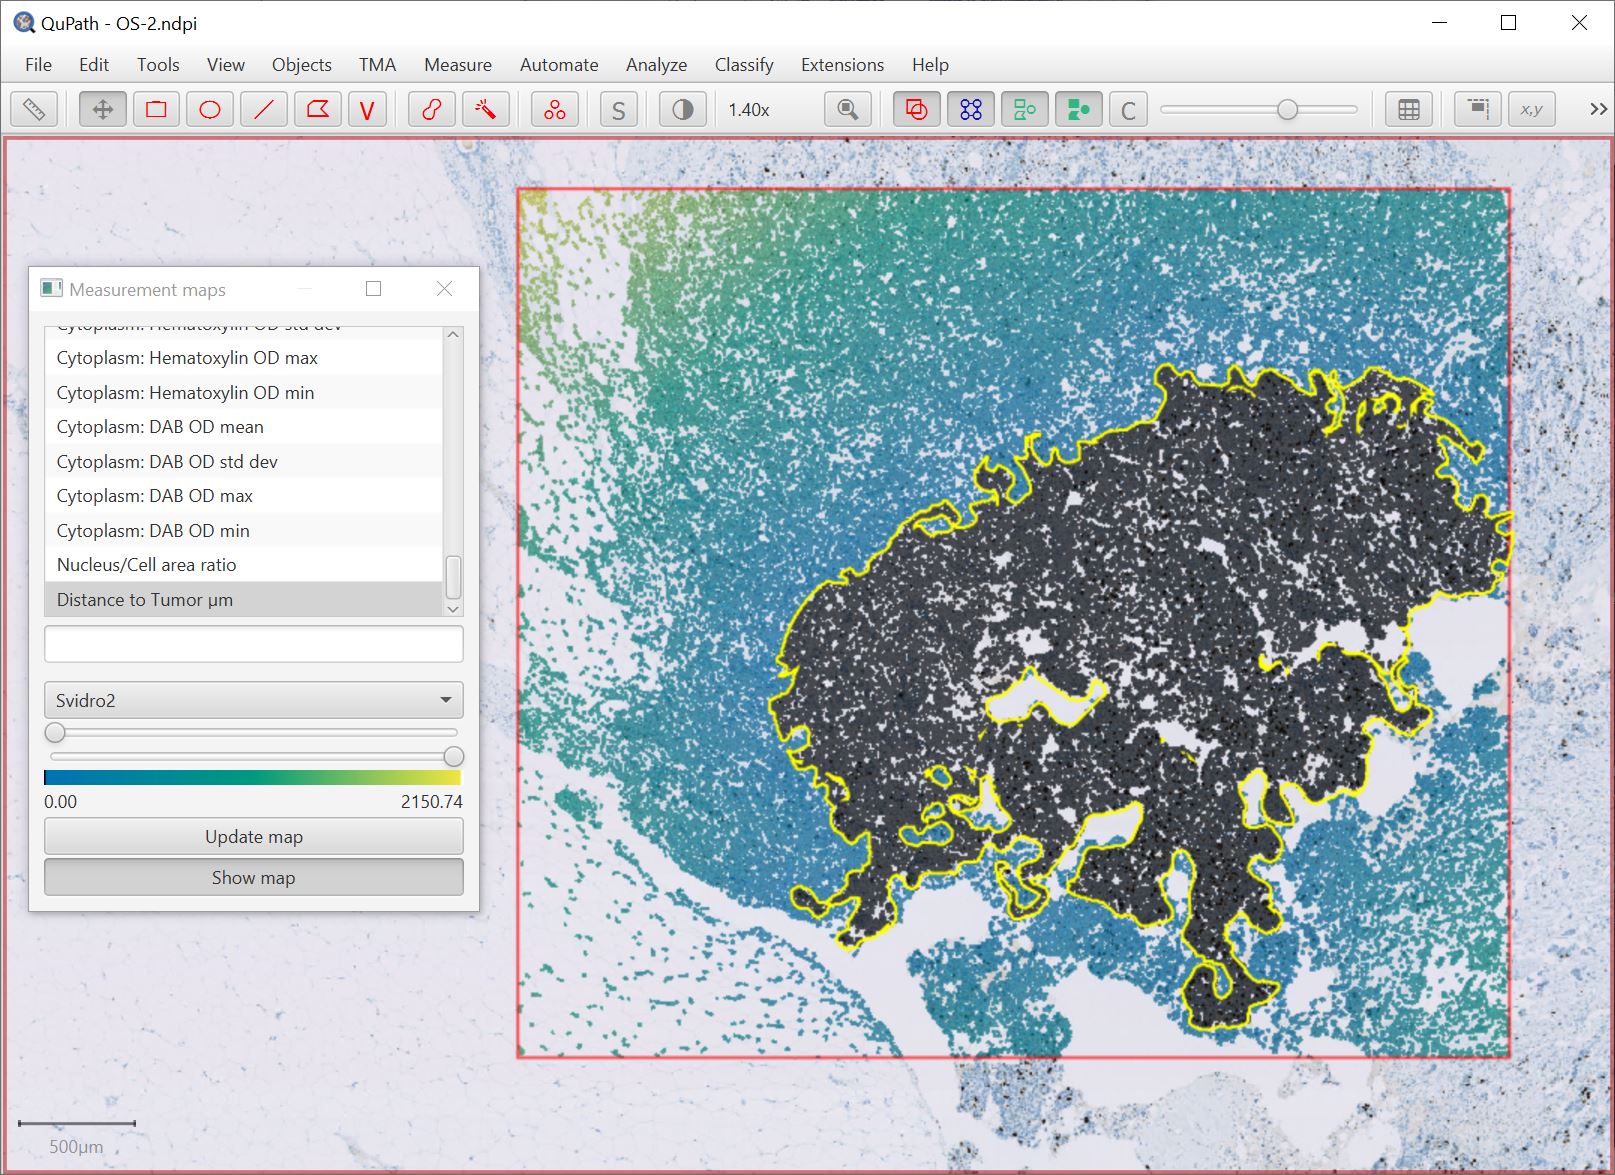
1 From one person, but a significant one person.
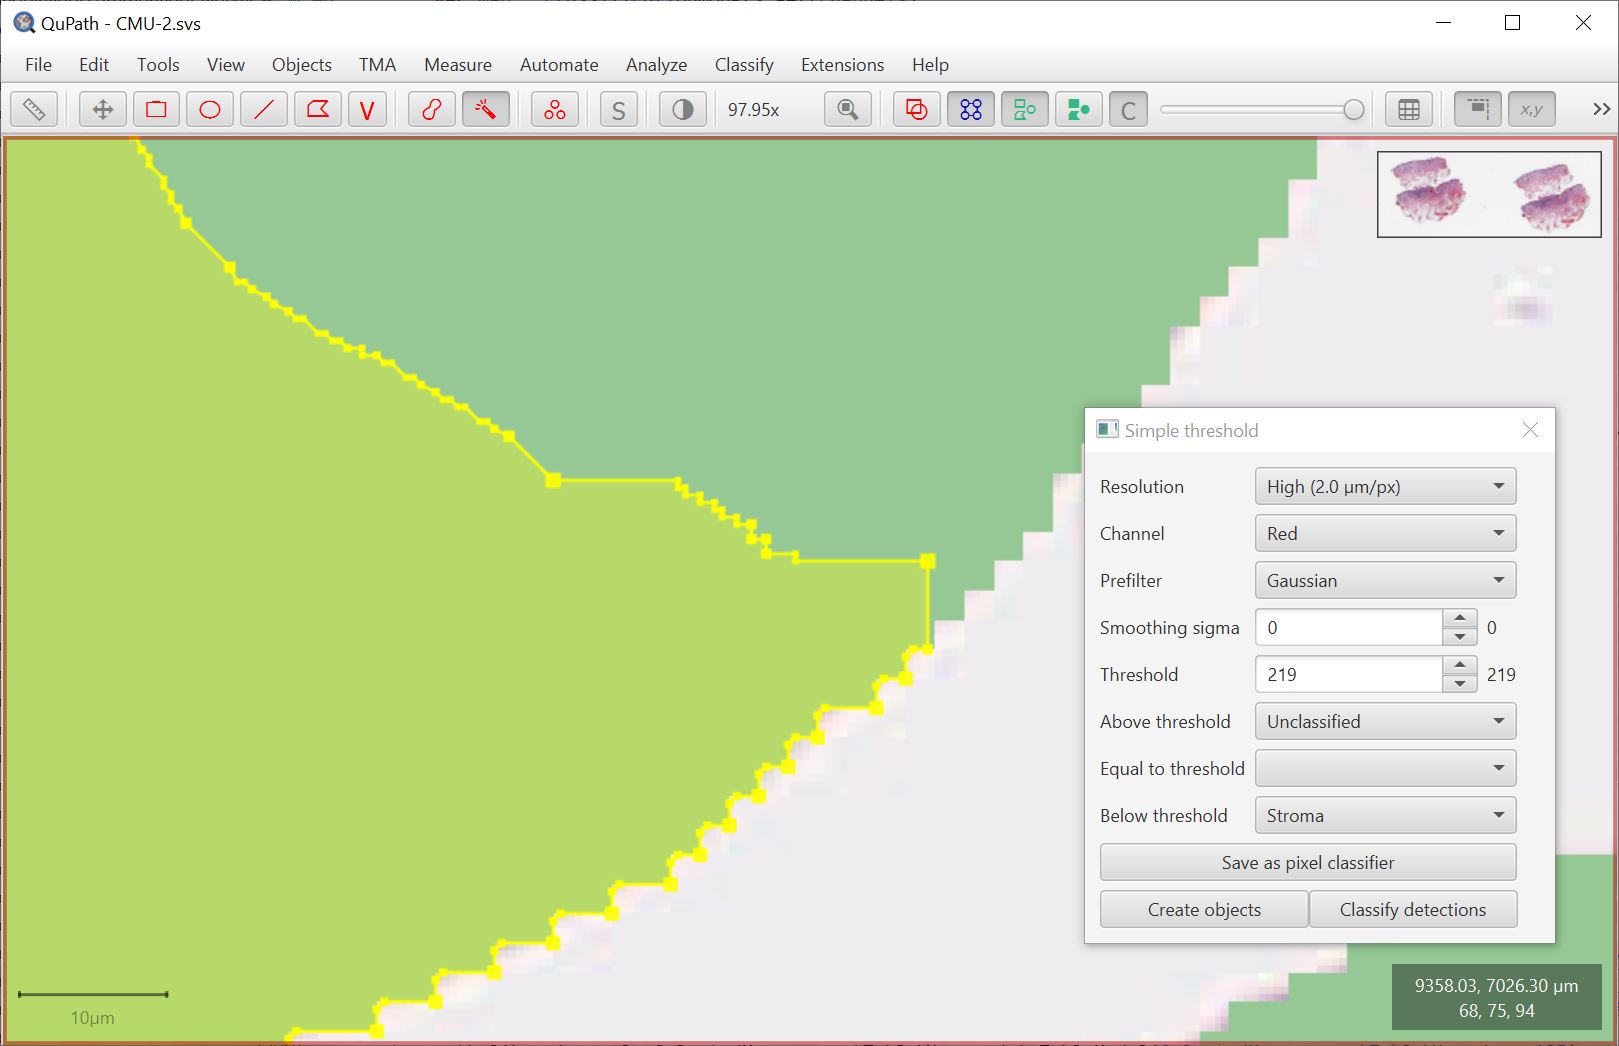
Improvements when annotating in detail
When using the pixel classifier, I often find I want to be really careful when annotating close to boundaries. Two changes help with this:
- The viewer permits zooming in to a higher magnification
- The (area) drawing tools can now ‘snap’ to pixel coordinates
The snapping is a work-in-progress; in particular, when moving a snapped object it can end up ‘between’ pixel coordinates. But even in this imperfect form I personally find it to be very useful.
It is possible to turn off Use pixel snapping in the preferences.
Using the brush tool to create a ROI with snapping on:
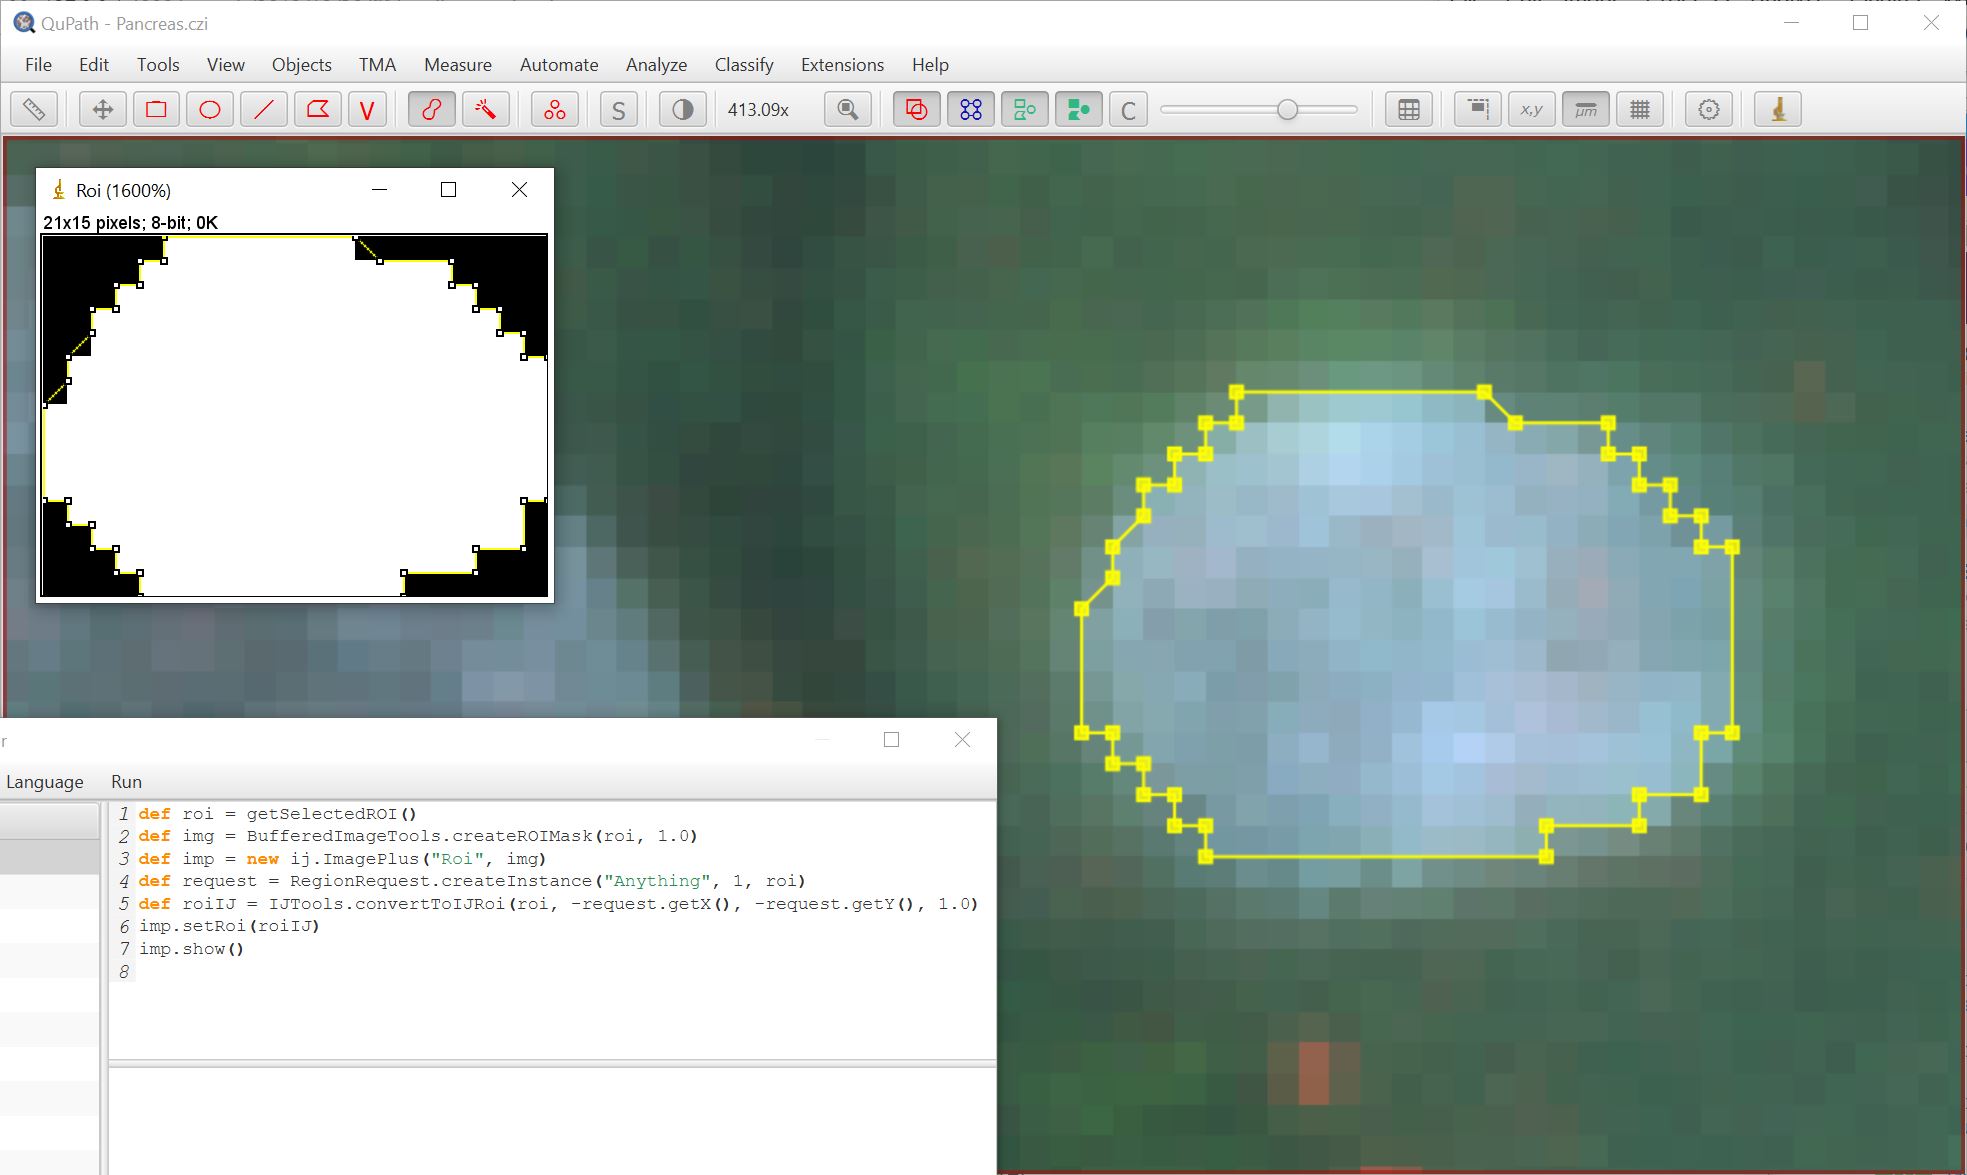
Using the brush tool to create a ROI with snapping off:

In each case a binary mask is created and shown in ImageJ using the following script:
def roi = getSelectedROI()
def img = BufferedImageTools.createROIMask(roi, 1.0)
def imp = new ij.ImagePlus("Roi", img)
def request = RegionRequest.createInstance("Anything", 1, roi)
def roiIJ = IJTools.convertToIJRoi(roi, -request.getX(), -request.getY(), 1.0)
imp.setRoi(roiIJ)
imp.show()
While sub-pixel annotations can look pleasingly smooth, one of the benefits of snapping is that the binary images created are more predictable. Another is that they (usually) contain fewer vertices, so QuPath may run a bit faster if you have a lot of annotations.
Writing images
QuPath’s ability to export images has improved in two main ways.
From the user interface
File → Export images… has been revised to give three options:
- Original pixels Export image regions selecting from a range of file formats, including JPEG, PNG, ImageJ TIFF, ImageJ ZIP and OME-TIFF.
- Rendered RGB Export an RGB version of the image as it appears with the current viewer settings. This is somewhat like ImageJ’s Flatten command.
- OME TIFF Similar to original pixels exclusively for OME-TIFF format, but with more fine-grained options to control the output (e.g. with compression type, pyramidal levels).
From scripts
Writing images in scripts used to be extremely cumbersome. Well no more!
In the event that your image is a manageable size to export in one go you can use
def server = getCurrentServer()
def path = buildFilePath(PROJECT_BASE_DIR, 'output.ome.tif')
writeImageRegion(server, path)
Often, you’ll want to extract a region. Here, I export the selected ROI downsampled by a factor of 4:
def server = getCurrentServer()
def path = buildFilePath(PROJECT_BASE_DIR, 'output.ome.tif')
def roi = getSelectedROI()
double downsample = 4
def region = RegionRequest.createInstance(server.getPath(), downsample, roi)
writeImageRegion(server, region, path)
Or to export the full image downsampled by a factor of 40:
def server = getCurrentServer()
def path = buildFilePath(PROJECT_BASE_DIR, 'output.ome.tif')
double downsample = 40
def region = RegionRequest.createInstance(server, downsample)
writeImageRegion(server, region, path)
You can change the file extension depending upon what file type you want, but beware that some file types don’t support all possible images (e.g. .jpg cannot be used successfully with a multiplexed, non-RGB fluorescence image).
Perhaps more excitingly, because there is not yet a proper way to export the pixel classification results as an image, you can use this script (which may also help with batch processing using Run for project).
This should be thought of as a workaround rather than the official way… but better than nothing.
// We do need to import this...
import qupath.lib.classifiers.pixel.PixelClassificationImageServer

// Load the classifier
def project = getProject()
def classifier = project.getPixelClassifiers().get('to test')

// Get the current image & create the (dynamically calculated) classified image
def imageData = getCurrentImageData()
def server = new PixelClassificationImageServer(imageData, classifier)

// Define an output path & file extension (may also choose .png, .ome.tif or something else)
def path = buildFilePath(PROJECT_BASE_DIR, 'classification')
mkdirs(path)
def name = getProjectEntry().getImageName()
path = buildFilePath(path, name + '.tif')

// Write the image
writeImage(server, path)
Memory monitor & show input
A while back I wrote a Memory Monitor script.
It’s now a built-in command under View → Show memory monitor.
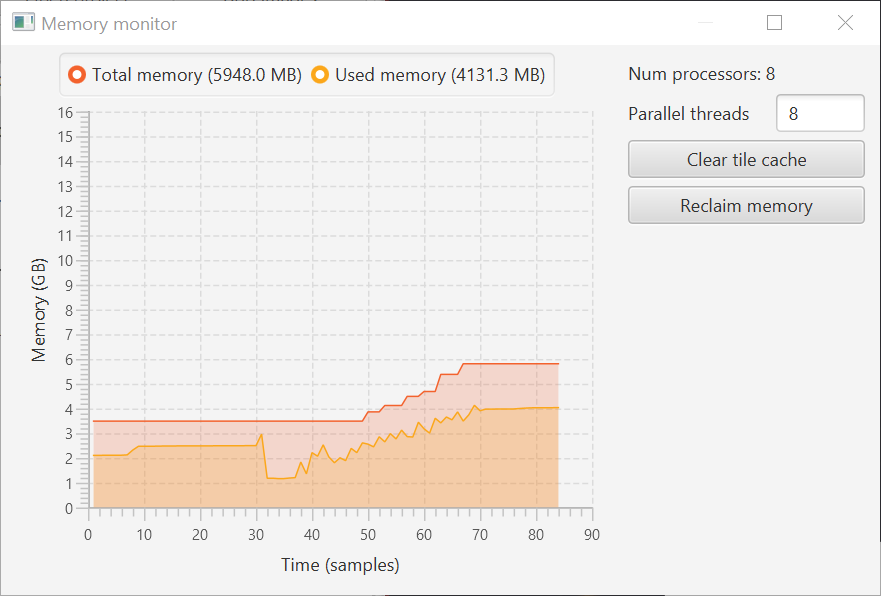
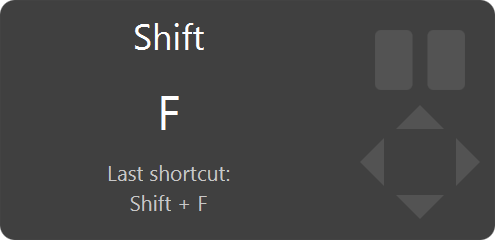
For good measure, it’s accompanied by View → Show input on screen to make shortcuts visible.
Many more improvements and bug fixes
There are lots of other changes and fixes, including:
- Fixed size estimate for large images (previously caused some images not to open)
- Fixed bug that meant the file chooser forgot the last directory
- Distance to annotations command supports line and point ROIs (not just areas)
- Converting tile classifications to annotations #359
- Calculating intensity features for RGB fluorescence #365
- Setting stroke thickness, thanks to @jballanc #362
For full details on what has changed, see the commit log.